Showing posts with label baby. Show all posts

Sunday, March 24, 2013

Catching Up


Wow—that was one long (unintended) hiatus! Somehow I thought that maternity leave would mean having more time to devote to the ol’ blog—you know, while my angelic baby slept for hours at a time during the day and I, well-rested and organized, would have plenty of time to read, cook and post thoughts about life and my newfound motherhood.

Ha!

In reality, my four months of maternity leave went by in the blink of an eye and my baby, while sweet and adorable, was not the world’s best sleeper during the day or at night which meant that a large part of my daily schedule consisted of trying to get her to sleep, thinking about how to get her to sleep, reading about how to get her to sleep and/or trying to get some sleep myself. Add in the busy holiday season plus some additional worries about finding loving and reliable child care (for when I went back to work) and weight gain issues and that was that. Now I am back at work and things seem to be going well. As Aimee gets older, all the things I worried incessantly about while on maternity leave seem to be finally falling into place—while not the world’s greatest sleeper she is sleeping most, if not all, of the night now, she’s gaining weight (thanks to a combo of breast milk and formula) and at seven months (!) is so active and fun to be around. 


I have lots of stories to share about all of it—and hopefully, I’ll be able to do that on a somewhat more regular basis now (famous last words....). I’ll be honest—there’s not a whole lot of interesting cooking going on these days but when  and if I find that secret to cooking dinner during the week while working full time and spending quality time with my baby and husband…I’ll be sure to post about it :) In the meantime, I hope the two of you who still check this blog on a regular basis will find the baby related stuff of interest (or at least enjoy the pictures) and you’ll stick around for the rare occasions where I try a new recipe, like the results, and actually remember to take a picture of it to share !


Friday, October 26, 2012

Nursery Reveal

I talked a little bit about my vision for Aimee's nursery back in the summer when I shared the trials and tribulations associated with the curtains I made (white furniture, gender neutral wall color, fun fabric, etc.), but I never got around to showing off the final product. So without further ado....the big reveal! We are pretty pleased with how it all turned out--sweet and girly without being over the top. And I especially like that both Jason and I contributed to Aimee's room (me with the curtains, Jason with the painted walls and refinished white cabinet). Although she doesn't spend that much time in there right now, I hope Aimee will enjoy it for years to come! Just like her, it was a labor of love.


(All pics except the last one are thanks to the fabulous Leigh Dameron)

Here are the details:
-Wall color: Benjamin Moore Wythe Blue (lattice pattern courtesy of Jason's awesome/meticulous taping skills)
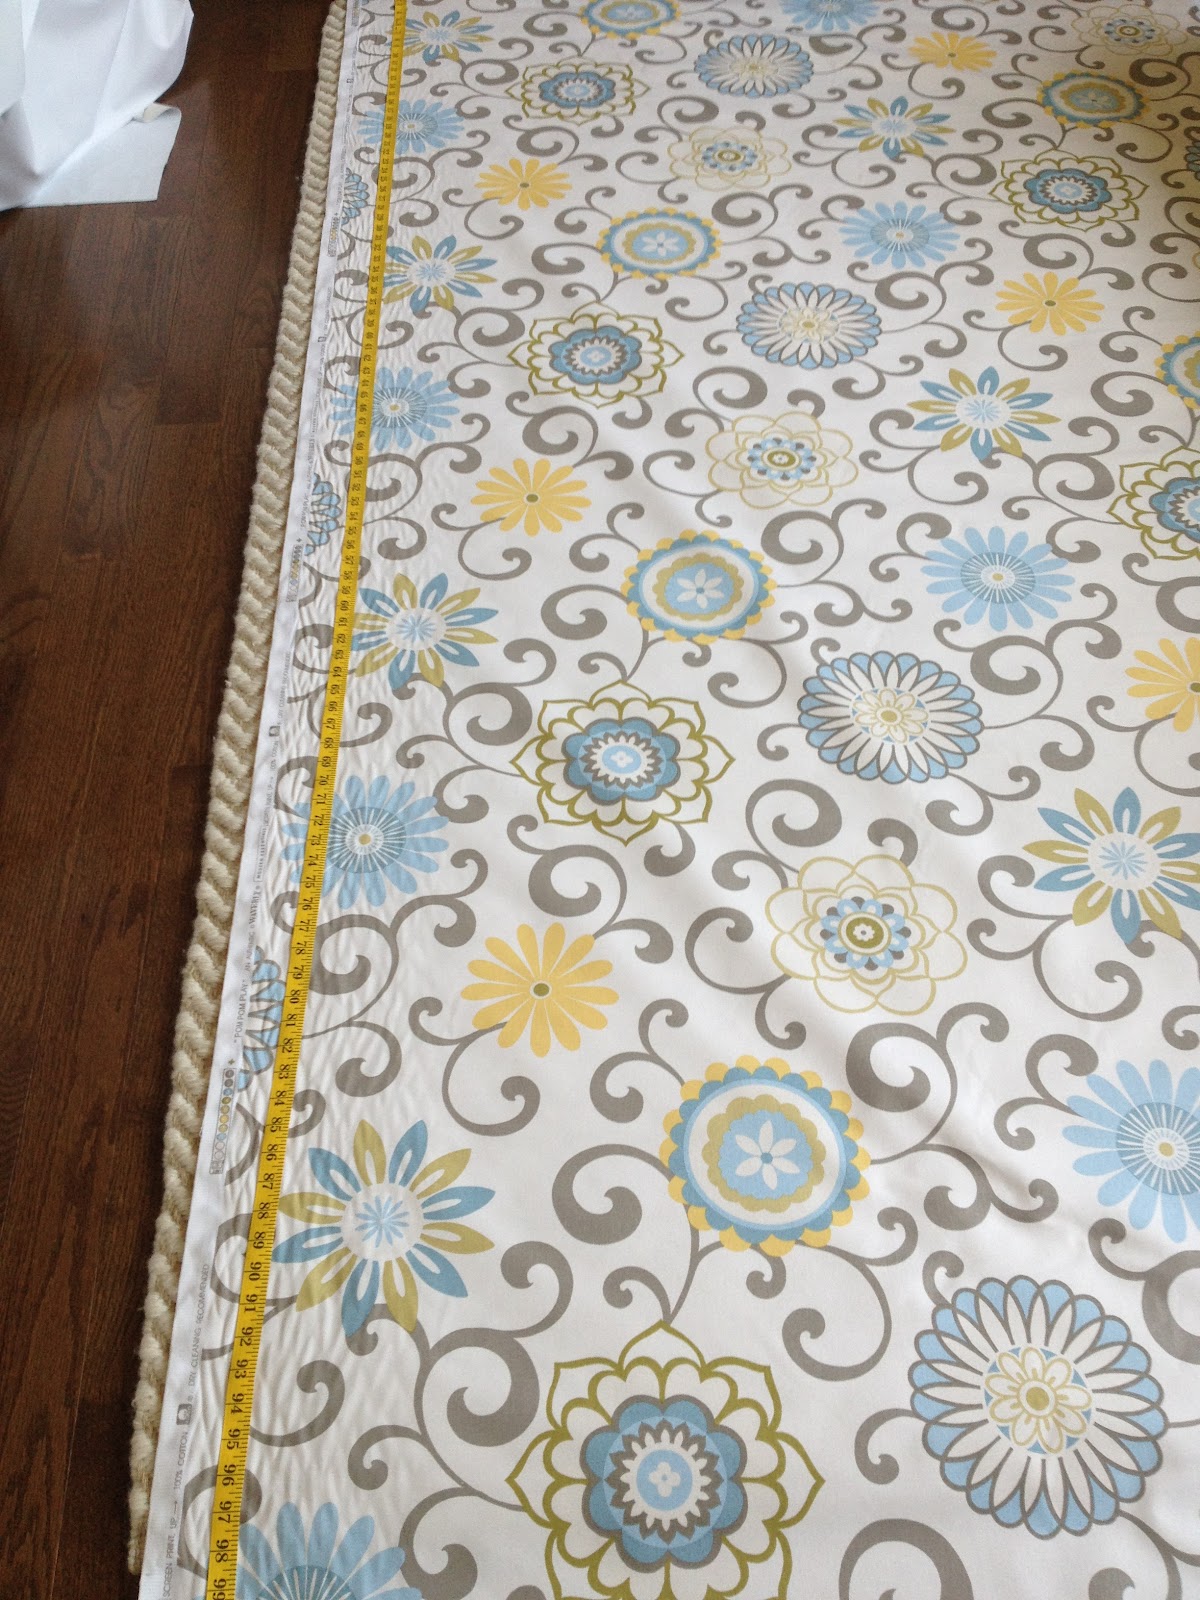
-Curtains: Wavery Pom Pom Play Spa (fabric from Fabric.com, sewn by me)
-Crib: Baby Mod Olivia from WalMart 
-White cabinet: something we already owned and refinished
-Crib skirt: Etsy (seller BabyLove)
-Chair: our biggest splurge....Little Castle, ordered from Belfort Furniture
-Letter A: Craft Cuts
-Knit blocks: Dwell Studio (from Amazon)
-Dresser/nightstand: Ikea
-Somewhere over the rainbow picture: Etsy (seller sugarfresh, colors selected by me)
-Whale picture: Society 6

Thursday, October 25, 2012

Two Months

I can't believe my baby is two months old already! And what a difference another month makes. Aimee is becoming a little person who does more than just eat, sleep, cry and poop....okay, those things still make up the bulk of her daily activities but now she smiles and coos and is beginning to really notice the world around her. It's pretty exciting to watch...I can't wait to see what the next month brings.


2 Month Stats: 8 lbs 6 ounces (staying strong on the 4th percentile growth curve) and 22.5 inches. 

Holy moly! She's grown 3 inches in the last two months-- newborn sized footie pjs are no longer possible and, as you can tell from the pic, even newborn size onesies are getting a little tight....which means we are officially into the 0-3 month clothes (or 3M in Carter's) although they are definitely a little big on her still.

She had her first round of vaccinations this week and did pretty well-- there was some intense crying but thankfully the nurse was really fast and had all three injections done in less than a minute. One of the keys to calming her down-- I nursed her for a few minutes before we got her dressed and headed home. She slept pretty much the entire afternoon but was pretty much back to normal by the next day.

Aimee at 1 month

Tuesday, October 16, 2012

From the Slow Cooker: Ratatouille and Orzo

I know I am overdue for a post on life with a newborn, but, in keeping with my blog's original theme, I thought I would first share one of the things I've learned about trying to cook dinner with a baby on hand so far.

I am on maternity leave until after the holidays, and aside from taking care of Aimee during the day, I try to make dinner most nights. Early on, I focused on frozen meals but we quickly got tired of our Trader Joe favorites and the baked pastas and casseroles that I had made prior to Aimee's birth. So I started trying to think about quick and easy dinners that I could get on the table with relative ease.

So far, I have found that the trick to cooking with an infant (for us anyway) is to either a) cook something all day (in a slow cooker/crock pot) or b) cook something really quickly right before you are going to eat (when Jason is home to keep an eye on the baby). Cooking all day has actually been the easier thing for me--I can get things ready to go during Aimee's morning snooze in her swing and then pretty much "set it and forget it" until Jason is home from work and we are ready to eat.

Aimee snoozing in her swing the day we brought her home from the hospital!

Unfortunately, I am short on good slow cooker recipes that aren't soups, stews or pot roasts. I have tried a few in the last 6 weeks but was only really happy with one of them -- ratatouille and orzo. This was insanely easy-- chop up some vegetables and throw them into the slow cooker with some olive oil and a can of diced tomatoes. Cook on low all day and add some orzo in at the end. Top with fresh basil, goat cheese, and a little balsamic vinegar and you've got a delicious and healthy meal. It's also easy to eat with one hand if you need to hold/calm a crying infant with the other!

Do you have any suggestions for good slow cooker recipes?


Ratatouille and Orzo
From Parents Need to Eat Too

Ingredients:
1 large eggplant, cut into 1 inch pieces
1 medium onion, roughly chopped
1 red peppers, chopped into 1 inch pieces
1 14.5 ounce can diced tomatoes
3 large garlic cloves, minced
1/3 cup olive oil
3 large zucchini, cut into 1 inch rounds
3 TBL chopped fresh basil
1/2 cup orzo
Goat cheese
Balsamic vinegar

1. Combine eggplant, onion, pepper, tomatoes and half of garlic in the slow cooker. Add olive oil and toss to coat. Cover and cook on low for 2-3 hours.

2. Stir in zucchini. Cover and continue to cook on low for another 2-2.5 hours.

3. During the last hour, add remaining garlic, 2 TBL of basil and salt and pepper to taste.

 4. In the last 15-20 minutes, add orzo. Before serving, top with crumbled goat cheese and remaining basil and drizzle with balsamic vinegar.

Wednesday, October 3, 2012

From the Freezer: Chicken Tamale Casserole


One of my third trimester goals was to fill our freezer full of delicious homemade meals that we could easily reheat once Aimee arrived. I had initially planned to make a few dishes each weekend in August until our little girl was born, but that did not end up working out exactly as planned thanks to the fact that Aimee decided to cozy up to my sciatic nerve and I was left with pretty terrible back pain when standing or walking the last few weeks of my pregnancy. I was able to suck it up long enough to make a few items the weekend before she was born and supplemented with some of our favorite frozen items from the neighborhood Trader Joe’s*.

I tried a couple of new recipes including one for a chicken tamale casserole that we really enjoyed. The recipe comes from one of my favorite “lifestyle” bloggers— Kate from Elefantitas Alegres. The original recipe includes making homemade enchilada sauce and roasting up fresh chiles—no doubt these extra steps would make the dish even more amazing, however I decided to go with her time-saving suggestions (since I was also trying to bang out a few other freezable meals the same day) and went with canned instead. It was a cinch to make and froze/reheated beautifully. I made it in two batches—we ate one on our first night home from the hospital and the second a few weeks later with chips and guacamole (from Trader Joe’s of course).

I would highly recommend this dish—whether you are making it ahead for yourself, for a friend, or simply planning to eat it the same day. Yum.

*In case you are interested, here are some of our favorite Trader Joe's frozen foods: meat lasagna, eggplant Parmesan, chicken tikka masala and naan, tamales (cheese and green chile and the chicken ones), and Mandarin chicken).


Chicken Tamale Casserole
Adapted (barely) from Kate at Elefantitas Alegres

Ingredients:
1.5 c. of corn muffin mix
2 eggs, beaten
kernels scrapped from 2 small ears of corn
½ c. milk
2 4oz. cans of chopped green chiles, drained
2 ½ c. cheese, grated (Kate suggests pepper jack-- I used a "mexican cheese" blend from the grocery store)
¼ T. chili powder
½ T. cumin
1 10oz can of your favorite red enchilada sauce
Meat from one natural rotisserie chicken, skin removed and shredded

1. Preheat oven to 400 degrees.
2. Fold eggs, corn kernels and milk into corn muffin mix. Add green chiles, 1/2 cup of grated cheese, chili powder and cumin and combine. Pour into a greased one 9×13 or two 8×8 inch baking dishes. Bake for 30 minutes, or until the middle of the mix is firm.
3. Pierce tamale base all over with a fork. Pour the majority of the enchilada sauce over the tamale base, then top with shredded chicken and remaining cheese. Drizzle the remaining sauce over the whole thing.
4. Casserole can either be baked immediately for 20 minutes at 400 degrees or wrapped and frozen. If you decide to freeze it, simply bake at 400 for 40 minutes or until hot.

Sunday, September 23, 2012

One Month


It’s hard to believe that Aimee is one month old already! In many ways, it feels like barely a week has gone by since we brought her home from the hospital. And although we don’t tend to accomplish much in a given day (eat, sleep, cry, diaper change…repeat), somehow they pass rather quickly. The first few weeks were a little rough as we (Jason, me and Aimee) began to adjust to our new way of life, but I think we are starting to get into the swing of things.  I am hopeful that in the next month, I’ll be able to spend a little more time on the ol’ blog; in the meantime, however, I’m hoping you’ll enjoy a retrospective of Aimee’s little life thus far :) It’s amazing how much she’s changed in such a short amount of time!

Happy One Month Birthday Aimee!


Thursday, August 30, 2012

What a Week!

A week ago today, our lives changed....


Welcome to the world, Aimee Katherine!


More to come :)

Sunday, August 19, 2012

Mission Accomplished!

Now that is what I can a stocked freezer.....


In addition to the normal freezer fare we already had (bread, ice cream, chicken breasts, etc.) and the vast quantities of Omaha steaks that were given to Jason as a congratulatory gift when he got a promotion recently (which you can see on the top and third shelves) we now have 

-Homemade baked ziti
-Homemade chicken tamale casseroles
-Homemade vegetable strombolis

(Recipes coming once we've had a chance to sample them.)

As well as a variety of our favorite frozen selections from Trader Joe's.

Sadly, I know this won't last all that long but at least it will be there when we need it! Good thing to, since Baby's estimated due date is T-minus 3 days and counting!

Saturday, July 7, 2012

Curtains for the Nursery: Mission Impossible?

Not too long after we found out we were having a baby, I did what most moms-to-be do and started planning the nursery. By the time we found out we were having a girl, I had completed countless hours of “research” on the web (mostly on sites like project nursery, etsy and various blogs) and had a few basic ideas: 1) I wanted the room to pretty and girly without being over the top (i.e. not a ton of pink); 2) I wanted the room color to be something that could potentially be used with a boy in case future baby #2 is a boy; 3) I wanted white furniture; and 4) I wanted some fun curtains to liven up the space but that would also block out all of the early morning light we get given our East-facing house.

The first three things were not that difficult to address, but finding pre-made, fun and functional curtains that did not cost an arm and a leg (especially given that I needed four panels for the two windows in the nursery) proved to be a bit of a challenge. Pottery Barn Kids seemed to have the greatest variety of blackout curtains but I wasn’t in love with the fabrics and they were definitely not cheap. So I thought about doing something more custom made—I had pretty good luck with my no-sew fake roman shades and had seen several other blogs talk about making actual curtain panels using a similar technique. The problem there was that these were generally not lined, and in order to keep out all the light I was going to need some heavy duty blackout lining.

It was at this point that I came across a tutorial for making lined curtains on the web and an idea was born—maybe I could actually sew these things myself.  The tutorial made it look so easy—it was a lot of ironing, some pining, and sewing a few straight lines. Surely I could figure this out. And it would be really nice to make something for my future child. It was settled –I was going to learn to sew by making curtains. Now it was just a matter of finding a sewing machine. Fortunately, I knew someone who had one—my mom. Granted it was 30 years old and probably hadn’t been operated in 18 years (my mom is not much of a seamstress either), but it was easily accessible. So back in the spring I asked her if I could borrow it and she said ok. She even dug out her old Reader’s Digest sewing manual for me.

Cut to last weekend when I finally decided it was time to get to work on my little project. I had found and ordered a fabric that both Jason and I really liked (Waverly’s Pom Pom Play) as well as some inexpensive blackout lining a month or so before and had purchased what seemed like all the necessary sewing supplies—thread, better scissors for cutting the fabric, straight pins, hem gauge, long measuring tape, etc.  I was ready to go—feeling so confident, in fact, that I was sure I would get them all done on Saturday and be able to spend Sunday relaxing around the house.

Yeah, right.

Saturday was perilously close to being a total disaster. Everything just took way longer than I expected—which, in hindsight, isn’t that surprising. I was (and still am) a total novice when it comes to sewing….why I thought I’d be able to whip these things out in an afternoon, I am not sure. But clearly my expectations were way too high. And being 8 months pregnant, it was also a lot more tiring that it would have been for someone not in their third trimester. Seriously, after an hour crawling around the floor measuring and cutting the fabric, and then 2 hours standing on hardwood floors/leaning over an ironing board and/or our dining room table trying to get the first (!) panel pinned, I hurt all over and just wanted to take a nap. And I hadn’t even sewed a stitch!

So you can imagine that by the time I finally sat down to the sewing machine, I was already pretty tired and frustrated at how long the process was taking. And when the sewing machine then decided to jam and/or the thread decided to break every 30 seconds (and I’m not exaggerating that much I promise), I was close to my wits end.  After almost 2 hours, I was *this close* to having the first panel complete when the thread broke for the 500th time—and I totally lost it. I just started sobbing. So loud, in fact, that Jason heard me from two flights up and came downstairs to see if I was ok (he’d been a great sport about helping me figure the sewing machine out to begin with—he actually had some middle school home ec  experience to call upon). I looked up at him and said (between sobs) “I…don’t….think….I….can….do…this.” To which he of course replied “You don’t have to! We can buy curtains. There is no reason that you have to do this.” But there was no turning back at that point. I had the fabric and I had invested a lot of my precious free time on this already—I was GOING to do this. I dried my tears, re-threaded the machine (which I had become quite adept at doing) and finished the curtain which we promptly hung up.

Then I did something very smart…. I took a break.  A long hot shower helped my aching muscles and dinner out improved my mood. When we got home that evening I decided to see how far I would get on another panel. And miracle of miracles….this one only took half the time! The ironing/pining went a lot faster and I figured out that part of the reason the thread kept breaking was I had the tension set too high (I also probably needed heavier duty thread --despite the fact that the sales person at the local fabric store recommended what I had previously purchased-- but I was able to make it work with the tension adjustments).

Sunday went more smoothly as well…the remaining panels took only about an hour and a half each. And I took a long break in between so as not to wear myself out.  All in all, despite the rough start, I was pretty pleased with how the curtains turned out. And proud of myself for making something for my child.

But if future baby #2 is a boy—he is totally getting store-bought curtains!

A few tips on making your own blackout curtains:
-This tutorial was really helpful. I pretty much followed her instructions as-is with only a few exceptions: 1) I used blackout fabric instead of a sheet to line the curtains; and 2) rather than hand-stitching the bottom hem once the curtains were hung, I measured the length from the curtain clip to the floor before I cut the fabric so that I could be sure to have exactly the right length I needed.

-Blackout fabric has two sides—a shiny (or vinyl looking) side and a matte (or fabric looking) side. The shiny side is what should go against your curtain fabric—you want the nicer, matte side to be the side showing.

-Fabric.com is a great site for choosing fabrics (it’s also where I got the fabric for my no-sew shades). They have an amazing variety and you can order swatches if you want to see something in person before you buy. Once you sign up, it seems like they are always running sales. I got all of my fabric (12 yards each of the Waverly fabric and the blackout lining) at 30% off and free shipping during one of their sales which was great. I also really appreciated that they shipped the fabric on large spools rather than folding it up which meant I didn’t have to spend (even more) hours trying to iron the wrinkles out of my 100% cotton fabric!


Sunday, July 1, 2012

Pancakes for Breakfast

As a child, I was a really big fan of the Tomie dePaola book Pancakes for Breakfast. Do you all know this book? It has no words, just illustrations, and depicts one woman's quest to make.... pancakes for breakfast. Her road to pancake paradise is not easy-- after she collects all of the ingredients (including tapping a maple tree for fresh maple syrup) they are ruined and her dreams are dashed. (Don't worry, though-- she finds a way to get those pancakes she's been dreaming of.) I don't what it is about that book that I loved so much-- maybe it was an early sign of my interest in cooking. Or maybe it's because I just happen to REALLY like pancakes. (And I do-- more on that in a second). Regardless, Pancakes for Breakfast was a must have on our baby registry-- I am really excited about sharing this book with our daughter (sounds so crazy to say)...who incidentally,  is "scheduled" (as much as due dates can be considered a schedule) to make her appearance in a little less than 8 weeks. Eek!

I always think of this book whenever we make pancakes at home, which is actually pretty often (most weekends in fact). After several years of trying various mixes and recipes, we've found a from scratch recipe that is now our go-to. I am pretty sure I've shown you pictures of the fruits of this recipe in the past, but never shared the recipe itself. And I thought this (very hot) Sunday morning would be a good time to let you in on our secret, so that you too can enjoy pancakes for breakfast.


Sorry for the repeat picture, I was sure I had taken pictures of pancakes in the past but can't seem to find them this morning!

The Best Buttermilk Pancakes

From The Kitchn

Note: The only update I've made to this recipe is to halve the original amount of butter-- from 5 TBL to 2.5-- and salt--from 1 teaspoon to just a half. If you decide you want your pancakes super buttery, add the full amount of salt. Other than that, it is all thanks to the The Kitchn. If you don't have buttermilk, you can substitute some yogurt per The Kitchn's suggestions; we've tried that to varying degrees of success. Instead, we pretty much buy buttermilk on a weekly basis. It really does make a huge difference! They say this serves 2-3 people. I'd say 2 hungry pancake lovers at best! They are great with blueberries too!

Ingredients:
2 1/2 TBL butter
1 1/4 cups flour
1 TBL sugar
1/2 teaspoon salt
1/2 teaspoon baking powder
1/2 teaspoon baking soda
1 egg, white and yolk separated
1 cup buttermilk
1/4 cup milk

1. Melt the butter and set aside. Meanwhile, combine dry ingredients (flour, salt, baking powder, baking soda) in a large bowl.
2. In a separate bowl, mix together buttermilk and regular milk. Add egg yolk and butter, mix until everything is incorporated.
3. Add buttermilk mixture to dry ingredients and stir until all the dry ingredients are moist. Add egg white and mix until everything is just combined. DO NOT OVERMIX! Seriously-- this is an important secret to making good pancakes; it is ok if the batter is lumpy looking. If you overmix, you will end up with tough pancakes. And nobody wants that!
4. Heat a griddle (we like to use an electric griddle for even heating) over medium heat (325 if you are using an electric); coat with cooking spray. Cook pancakes per usual (or have your partner do it; in our house, I make the batter and Jason cooks the actual pancakes!).