I have a serious case of the blahs this week. I don’t know if it’s the crappy weather we’ve been having the last couple of days, a general sense of ennui with my current routine, or what, but I’ve been incredibly tired and generally apathetic about almost everything. I made myself go to the gym today in hopes that it would put some pep in my step but no such luck. I still feel like doing a whole lot of nothing. Which is why I very nicely asked Jason if he could pick something up for dinner on his way home from work (thank goodness for Rocklands!) That’s right I am so tired and blah-ed out that I don’t even want to cook.
So instead of a recipe post or even a random musing on married life, I decided to share few links with you that have caught my interest over the last few days. Hopefully they will tide you over until my usual energy returns!
http://www.ehow.com/how_4482102_pots-pans-natural-green-cheap.html I have a baking sheet that looks like it’s been through the wringer. I blame it on the fact that I have let it sit in soapy water for longer than it should. I am going to give this a try sometime soon and see if I can restore it to its former glory.
http://www.seriouseats.com/2010/05/how-to-make-pitcher-drinks-summer-cocktails-recipes.html We don’t have ability to entertain outdoors at the moment but I am dreaming of the day we do. And you better believe I will be making some tasty pitcher drinks to celebrate (I may use some of these good ideas –such as freezing ice in a oj concentrate tube so it will melt slower—the next time I host book club…who says pitcher drinks are just for barbeques?!)
http://www.seriouseats.com/2010/04/knife-skills-how-to-sharpen-a-knife.html This just seems like an invaluable skill to have.
http://www.expressnightout.com/content/2010/05/go-ape-rockville-lake-needwood-park.php My friend Jenny and her husband Dan (who are, by the way, two of the nicest people around) just opened Go Ape, an outdoor adventure course, in Rockville, MD. I am always so inspired (and a bit envious) of people who have the guts to strike out on their own. And from the looks of it, Jenny and Dan are going to be quite successful! Despite my issue with heights, I may have to Go Ape sometime soon :)
Wednesday, May 12, 2010


Tuesday, May 11, 2010
Making Use of a Mise en Place
That’s right I’m getting all fancy on you and breaking out French cooking terms! Cause that’s what Tuesdays are for (apparently). “Mise en place” basically means “everything in its place” and refers to having all of the ingredients you need on hand, ready to go when it comes time to make a dish. It’s how professional kitchens operate---because if you had to wait for all your ingredients to get prepped it would take a lot longer for your meal to be made and served (which means the restaurant would not make as much money). Using a mise en place is good for the home cook as well—with all the prep work out of the way, you can pay more attention to cooking things appropriately and efficiently instead of getting distracted by those herbs you still need to chop.
Since I work at home and don’t have much of a commute, I am “home from work” a lot earlier than Jason. Lately I’ve been doing all my prep work (building my mise en place if you will) as soon as work ends and then when Jason calls me and lets me know he’s on his way home, I can start the actual cooking. And still have dinner on the table when Jason walks in the door!
The use of a mise en place is particularly critical when making things like Pad Thai. Tonight was my first attempt at the dish and I would say it was mostly successful. But the cooking process is really all of three minutes so you have to have everything chopped and ready to go ahead of time. I decided to dip my toes into these untested Pad Thai waters with a scaled-down version that comes from this month’s issue of Everyday Food (where else!). Jason liked the dish but as someone who has eaten Pad Thai a hundred times at various restaurants, I found the flavor to be somewhat lacking. However it was easy and good for a weeknight. And it’s inspired me to looking into more authentic Pad Thai recipes—so stay tuned!

 Vegetable Pad Thai
Adapted from Everyday Food
Ingredients:
6 ounces dried, wide and flat rice noodles
1 TBL brown sugar
2 TBL fresh lime juice
3 TBL soy sauce
2 teaspoons vegetable oil
3 scallions, white and green parts separated and thinly sliced
1 garlic clove, minced
2 large eggs, lightly beaten
½ cup fresh cilantro, chopped
¼ cup chopped peanuts
1.Bring 3 cups of water to a boil. Turn off heat and add rice noodles and soak for 4 minutes. Drain. Rinse with cold water and set aside.
2.Once you have your mise en place ready to go, heat oil in a large non-stick skillet over medium high heat. Add scallion whites and garlic and cook, stirring constantly, for about 30 seconds. Add eggs and cook, scraping with a rubber spatula until eggs are cooked, about 30 seconds. Remove egg mixture and set aside.
3.Add noodles and soy sauce mixture to skillet. Toss constantly until noodles are soft and coated with sauce—about 1 minute. Add egg mixture and toss, gently breaking up eggs and letting it all mix together.
4.Top noodles with cilantro, scallion greens, and peanuts and serve.
Since I work at home and don’t have much of a commute, I am “home from work” a lot earlier than Jason. Lately I’ve been doing all my prep work (building my mise en place if you will) as soon as work ends and then when Jason calls me and lets me know he’s on his way home, I can start the actual cooking. And still have dinner on the table when Jason walks in the door!
The use of a mise en place is particularly critical when making things like Pad Thai. Tonight was my first attempt at the dish and I would say it was mostly successful. But the cooking process is really all of three minutes so you have to have everything chopped and ready to go ahead of time. I decided to dip my toes into these untested Pad Thai waters with a scaled-down version that comes from this month’s issue of Everyday Food (where else!). Jason liked the dish but as someone who has eaten Pad Thai a hundred times at various restaurants, I found the flavor to be somewhat lacking. However it was easy and good for a weeknight. And it’s inspired me to looking into more authentic Pad Thai recipes—so stay tuned!

My mise en place--peanuts, soy sauce mixture, scallion whites and garlic, cilantro and scallion greens

Adapted from Everyday Food
Ingredients:
6 ounces dried, wide and flat rice noodles
1 TBL brown sugar
2 TBL fresh lime juice
3 TBL soy sauce
2 teaspoons vegetable oil
3 scallions, white and green parts separated and thinly sliced
1 garlic clove, minced
2 large eggs, lightly beaten
½ cup fresh cilantro, chopped
¼ cup chopped peanuts
1.Bring 3 cups of water to a boil. Turn off heat and add rice noodles and soak for 4 minutes. Drain. Rinse with cold water and set aside.
2.Once you have your mise en place ready to go, heat oil in a large non-stick skillet over medium high heat. Add scallion whites and garlic and cook, stirring constantly, for about 30 seconds. Add eggs and cook, scraping with a rubber spatula until eggs are cooked, about 30 seconds. Remove egg mixture and set aside.
3.Add noodles and soy sauce mixture to skillet. Toss constantly until noodles are soft and coated with sauce—about 1 minute. Add egg mixture and toss, gently breaking up eggs and letting it all mix together.
4.Top noodles with cilantro, scallion greens, and peanuts and serve.
Monday, May 10, 2010
A Kitchen Clambake (minus the clams)
By now y’all know me well enough to know just how much I love Ina Garten (aka the Barefoot Contessa). I love her. I love her recipes. I love her house. And I secretly wish I could quit my day job (which I do actually enjoy) and become a self-taught cook/entrepreneur/store owner just like her. While this is an unlikely scenario, I can learn to entertain like her. If you are familiar with her show, she almost always cooks some elegant yet homey meal for friends or her husband, Jeffrey. (Side note: there is something about Jeffrey that reminds me of Jason…maybe it’s because he is always so happy to eat Ina’s food and he always acts like whatever she makes on that particular day is THE BEST THING HE’S EVER EATEN and Jason does that with pretty much everything I make too.) On one particular show, she made a Kitchen Clambake where she filled a huge stockpot full of all kinds of seafood (mussels, shrimp, lobster, etc.), corn on the cob, potatoes and steamed it in white wine and stock. And she served it with crusty bread (to sop up the sauce) on a long table covered in newspaper. It looked awesome. I’ve been waiting since the day I first saw that episode (probably several years ago now) to make that meal and serve it a large group of close friends.
Tonight… was not that night. (Sorry, if I got your hopes up there for a second.)
Instead I made a scaled down version of the kitchen clambake courtesy of Everyday Food. In this version, you make individual foil packets and fill them with fish, shrimp, sliced new potatoes, and corn on the cob, and cook it on the grill (or in our case in the oven) with a composite butter of dill and garlic. It wasn’t the showstopper of my dreams, but served with some lemon and dill asparagus, it was a nice weeknight meal for two. And as predicted, Jason thought it was one of the best meals I’ve ever made. Who needs more than that?!


New England Seafood Bake
Adapted from Everyday Food
Ingredients:
2 TBL butter, room temperature
2 TBL finely chopped fresh dill, plus more for the asparagus if you decide to make that as a side
1 small garlic clove, minced
Salt and pepper
2-3 red new potatoes (depending on size), scrubbed and thinly sliced
1 tilapia fillet, cut into two equal pieces
¼ lb of frozen uncooked shrimp, thawed
1 ear of corn, cut in half
½ lemon, thinly sliced (reserve the other half for the asparagus if you are making)
White wine (optional)
1.Preheat oven to 425. In a small bowl, combine butter, dill and garlic. Season with salt and pepper.
2.Tear off two large pieces of aluminum foil. Divide ingredients evenly between the two pieces of foil and assemble packets. Start by arranging potatoes in a single layer on one-half of the foil. Top with tilapia, then shrimp. Place ½ corn on one side. Season with salt and pepper. Add a dollop or two of the butter and top with two lemon slices. Splash the top with a tablespoon or so of white wine if using. Fold foil over ingredients and crimp edges tightly to seal. Place on baking pan.
3.Bake at 425 for 15 minutes or so until potatoes are tender (note: I found the potatoes to still be a little al dente for my taste—next time I might consider par-boiling the potatoes or even sticking the slices in the microwave to give them a heads start on the rest of the ingredients which don’t require as much time to cook through). Remove from oven, slit packets open and serve. If desired, serve was roasted asparagus with lemon and dill (see below).
To make asparagus—trim woody ends of asparagus. Toss with olive oil, salt and pepper and place on a baking sheet. Cook at 425 alongside the seafood packets. Squeeze half a lemon, top with reserved dill and serve.
I would be remiss if I discussed the joys of cooking with seafood and did not say something about the oil spill along the Gulf Coast that is threatening our nation’s food supply as well as the livelihood of American fisherman for years (and maybe even decades) to come (not to mention the environmental ramifications). The New York Times had a sobering article about the impact this will have not only on those living and working on the Gulf Coast but for those of us who enjoy the fruits of their labor on a regular basis. Definitely worth a look if you have a free minute.
Tonight… was not that night. (Sorry, if I got your hopes up there for a second.)
Instead I made a scaled down version of the kitchen clambake courtesy of Everyday Food. In this version, you make individual foil packets and fill them with fish, shrimp, sliced new potatoes, and corn on the cob, and cook it on the grill (or in our case in the oven) with a composite butter of dill and garlic. It wasn’t the showstopper of my dreams, but served with some lemon and dill asparagus, it was a nice weeknight meal for two. And as predicted, Jason thought it was one of the best meals I’ve ever made. Who needs more than that?!


New England Seafood Bake
Adapted from Everyday Food
Ingredients:
2 TBL butter, room temperature
2 TBL finely chopped fresh dill, plus more for the asparagus if you decide to make that as a side
1 small garlic clove, minced
Salt and pepper
2-3 red new potatoes (depending on size), scrubbed and thinly sliced
1 tilapia fillet, cut into two equal pieces
¼ lb of frozen uncooked shrimp, thawed
1 ear of corn, cut in half
½ lemon, thinly sliced (reserve the other half for the asparagus if you are making)
White wine (optional)
1.Preheat oven to 425. In a small bowl, combine butter, dill and garlic. Season with salt and pepper.
2.Tear off two large pieces of aluminum foil. Divide ingredients evenly between the two pieces of foil and assemble packets. Start by arranging potatoes in a single layer on one-half of the foil. Top with tilapia, then shrimp. Place ½ corn on one side. Season with salt and pepper. Add a dollop or two of the butter and top with two lemon slices. Splash the top with a tablespoon or so of white wine if using. Fold foil over ingredients and crimp edges tightly to seal. Place on baking pan.
3.Bake at 425 for 15 minutes or so until potatoes are tender (note: I found the potatoes to still be a little al dente for my taste—next time I might consider par-boiling the potatoes or even sticking the slices in the microwave to give them a heads start on the rest of the ingredients which don’t require as much time to cook through). Remove from oven, slit packets open and serve. If desired, serve was roasted asparagus with lemon and dill (see below).
To make asparagus—trim woody ends of asparagus. Toss with olive oil, salt and pepper and place on a baking sheet. Cook at 425 alongside the seafood packets. Squeeze half a lemon, top with reserved dill and serve.
I would be remiss if I discussed the joys of cooking with seafood and did not say something about the oil spill along the Gulf Coast that is threatening our nation’s food supply as well as the livelihood of American fisherman for years (and maybe even decades) to come (not to mention the environmental ramifications). The New York Times had a sobering article about the impact this will have not only on those living and working on the Gulf Coast but for those of us who enjoy the fruits of their labor on a regular basis. Definitely worth a look if you have a free minute.
Sunday, May 9, 2010
I Scream, You Scream...
When trying to decide what to do with our massive strawberry haul, the first thing that came to my mind was ice cream. When I was growing up we usually made homemade ice cream a couple times during the summer, usually for July 4th or Memorial Day, and it almost always involved strawberries. My mom would make the base from egg yolks, milk/cream, vanilla, and sugar, and we would slice strawberries until our hands turned pink from all the juices. Then I would watch my dad get the machine ready to go. We had one of those electric ice cream makers that made a gallon of ice cream at a time, and required ice and rock salt so we had to do it in the garage. It was quite the production and we treated it as such. Usually a pound cake was made to go with the ice cream and neighbors were often invited over to partake of its creamy, fruity goodness. Our ice cream always tasted better than what you could buy in the store. Or at least that’s how I remember it. (PS Happy Mother’s Day, Mom!)
When it came time to create our wedding registry last year, I was adamant about including an ice cream maker on the list. We chose one of the smaller versions that do not require ice or salt. You simply place the bowl in the freezer overnight and pour in the ice cream mix and the machine does all the work. Today was the first time we used it together (I made some chocolate sorbet once last fall by myself to surprise Jason with when he came home from being gone one weekend with mixed results) and I was really excited to try my hand at the strawberry ice cream I remembered so fondly from my youth.
I consulted David Lebovitz’s The Perfect Scoop (which I bought for myself not long after the wedding in anticipation of using our new ice cream maker at some point in the future) for a recipe and much to my surprise, his strawberry ice cream did not require eggs! Apparently, there are multiple styles of ice cream—French-style ice cream uses a custard base made with egg yolks while Philadelphia-style ice cream is made with cream (and sometimes milk) but no eggs. Most of David Lebovitz’s fruit-based ice cream recipes use the Philadelphia-style since he thinks is preferable to “let the flavor the fruits come forward without all the richness” of the French-style. Even thought it was not the custard-base ice cream of my youth I decided to give it a shot…if for no other reason than it is a whole lot simpler to make!
Macerated strawberries, cream, lemon juice, and (the surprise ingredient) sour cream pureed, chilled and then poured into our Cuisinart ice cream freezer. In the words of Ina—“how bad can that be?!”
Not bad at all. It’s going to be a tasty summer!


Strawberry-Sour Cream Ice Cream
Adapted (hardly at all) from David Lebovitz
Ingredients:
1 pound fresh strawberries, rinsed and sliced
¾ cup of sugar
1 TBL Cointreau (originally recipe called for vodka or kirsch but we had neither so I went with what we had)
1 cup sour cream
1 cup heavy cream
½ lemon, juiced
1.Toss sliced strawberries with sugar and Cointreau, stirring until sugar begins to dissolve. Cover and let stand at room temperature for 1 hour, stirring occasionally.
2.Place strawberries (and all the ruby red liquid that comes out of them), cream, sour cream, and lemon juice into a blender or food processor and pulse until smooth but still slightly chunky. Refrigerate for 1 hour. Note: if you use a blender you can just place the vessel in the fridge which means 1 less dish to wash!
3.Freeze in your ice cream maker according to the manufacturer’s instructions.
When it came time to create our wedding registry last year, I was adamant about including an ice cream maker on the list. We chose one of the smaller versions that do not require ice or salt. You simply place the bowl in the freezer overnight and pour in the ice cream mix and the machine does all the work. Today was the first time we used it together (I made some chocolate sorbet once last fall by myself to surprise Jason with when he came home from being gone one weekend with mixed results) and I was really excited to try my hand at the strawberry ice cream I remembered so fondly from my youth.
I consulted David Lebovitz’s The Perfect Scoop (which I bought for myself not long after the wedding in anticipation of using our new ice cream maker at some point in the future) for a recipe and much to my surprise, his strawberry ice cream did not require eggs! Apparently, there are multiple styles of ice cream—French-style ice cream uses a custard base made with egg yolks while Philadelphia-style ice cream is made with cream (and sometimes milk) but no eggs. Most of David Lebovitz’s fruit-based ice cream recipes use the Philadelphia-style since he thinks is preferable to “let the flavor the fruits come forward without all the richness” of the French-style. Even thought it was not the custard-base ice cream of my youth I decided to give it a shot…if for no other reason than it is a whole lot simpler to make!
Macerated strawberries, cream, lemon juice, and (the surprise ingredient) sour cream pureed, chilled and then poured into our Cuisinart ice cream freezer. In the words of Ina—“how bad can that be?!”
Not bad at all. It’s going to be a tasty summer!

Strawberries immediately after they've been tossed with sugar and Cointreau

An hour later...look a all that yummy juicy goodness!


Strawberry-Sour Cream Ice Cream
Adapted (hardly at all) from David Lebovitz
Ingredients:
1 pound fresh strawberries, rinsed and sliced
¾ cup of sugar
1 TBL Cointreau (originally recipe called for vodka or kirsch but we had neither so I went with what we had)
1 cup sour cream
1 cup heavy cream
½ lemon, juiced
1.Toss sliced strawberries with sugar and Cointreau, stirring until sugar begins to dissolve. Cover and let stand at room temperature for 1 hour, stirring occasionally.
2.Place strawberries (and all the ruby red liquid that comes out of them), cream, sour cream, and lemon juice into a blender or food processor and pulse until smooth but still slightly chunky. Refrigerate for 1 hour. Note: if you use a blender you can just place the vessel in the fridge which means 1 less dish to wash!
3.Freeze in your ice cream maker according to the manufacturer’s instructions.
Saturday, May 8, 2010
A Beautiful Day in the Neighborhood
Jason and I have decided to take advantage of the lovely weather and our prime Northern Virginia location and spend some time in and around our neighborhood today.
First stop….our local farmer’s market. It had been awhile since I’d visited the market (which is open every Saturday throughout the entire year) and I was definitely kicking myself for not making an appearance earlier this spring. The market was teaming with plants, herbs, asparagus, free range meats, fresh cheese, and the first signs of strawberry season! We got a little excited and came home with:
Some huge asparagus

A pretty garden bouquet

And strawberries.

Lots of strawberries.
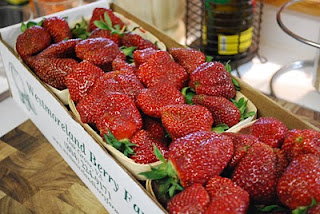 (Keep your eyes out for some strawberry based recipes to come in the next couple of days.)
Next on our agenda….hiking around Roosevelt Island! And possibly a trip to Eventide's rooftop this evening.
How are you spending your Saturday?
First stop….our local farmer’s market. It had been awhile since I’d visited the market (which is open every Saturday throughout the entire year) and I was definitely kicking myself for not making an appearance earlier this spring. The market was teaming with plants, herbs, asparagus, free range meats, fresh cheese, and the first signs of strawberry season! We got a little excited and came home with:
Some huge asparagus

A pretty garden bouquet

And strawberries.

Lots of strawberries.

Next on our agenda….hiking around Roosevelt Island! And possibly a trip to Eventide's rooftop this evening.
How are you spending your Saturday?
Thursday, May 6, 2010
Kicking it Up a Notch
There’s nothing like getting measured for a bridesmaid’s (ahem, matron of honor) dress to make you feel really bad about yourself. Why these traditional dress designers (e.g., not J.Crew or Ann Taylor where you get to order a size that is akin to what you normally wear) have to have sizes that run small, I’ll never know. But it really sucks to be told you need to order a dress that is two or even three sizes bigger than what you wear regularly. I know size is nothing but a number and all that, but it really is demoralizing.
But it also serves as just the motivation I need to get in shape! When I last spoke about my battle with the dreaded Newlywed Nine, I was starting to get on a better workout routine. Doing that was easier said than done given my crazy travel schedule. However, last week (my first back with no travel) I worked out three days and did a long walk (almost 4 miles total) with Jason another day. But this week, I’m kicking it up a notch and have started alternating cardio (either the treadmill at the gym or one of my DVDs—Turbo Jam and 30 Day Shred are my go-tos) and targeted toning.
To help with this, I recently bought Denise Austin’s Hit the Spot Target Toners DVD. It includes 10 five-minute workouts each targeting a specific muscle group. You can do all 10 for a 50 minute, total body workout or you can create your own shorter combo. Today, I did my own routine of arms, shoulders, hips, and butt. Denise can be kind of annoying with her super peppy “you can do it” attitude but the workouts are so short that they go by really quickly and it’s hard to get bored. We’ll see what kind of results I get.

Hopefully this goal of doing something every day (even if it is just 20 minutes of toning) and incorporating some weight/strength based exercises will help kick-start my metabolism and keep me on track!
What helps get you motivated to stay healthy?
But it also serves as just the motivation I need to get in shape! When I last spoke about my battle with the dreaded Newlywed Nine, I was starting to get on a better workout routine. Doing that was easier said than done given my crazy travel schedule. However, last week (my first back with no travel) I worked out three days and did a long walk (almost 4 miles total) with Jason another day. But this week, I’m kicking it up a notch and have started alternating cardio (either the treadmill at the gym or one of my DVDs—Turbo Jam and 30 Day Shred are my go-tos) and targeted toning.
To help with this, I recently bought Denise Austin’s Hit the Spot Target Toners DVD. It includes 10 five-minute workouts each targeting a specific muscle group. You can do all 10 for a 50 minute, total body workout or you can create your own shorter combo. Today, I did my own routine of arms, shoulders, hips, and butt. Denise can be kind of annoying with her super peppy “you can do it” attitude but the workouts are so short that they go by really quickly and it’s hard to get bored. We’ll see what kind of results I get.

Hopefully this goal of doing something every day (even if it is just 20 minutes of toning) and incorporating some weight/strength based exercises will help kick-start my metabolism and keep me on track!
What helps get you motivated to stay healthy?
Wednesday, May 5, 2010
Some Jerk (Chicken)
As you may remember, we had dinner with Jason’s parents last weekend to celebrate his dad’s birthday. His mother had planned to make some sort of mango and avocado salad to go with the meal only to learn at the last minute that Jason’s dad does not like mangoes. His loss was our gain and we went home with two very ripe mangoes. When trying to figure out what to make this week, I was determined not to let the mangoes go to waste. The logical choice was some sort of mango salsa. And jerk chicken seemed like the perfect accompaniment.
If you are unfamiliar with the dish, the “jerk” in jerk chicken is a marinade with a wonderful mix of sweet/fruity and spicy flavors. Be sure to marinate the chicken for a good long while so it can soak up all the flavors (if my chicken had been thawed I would have done so overnight but instead I settled for 8 hours during the day yesterday). Served with mango salsa and some corn on the cob, you have a fantastic summery meal.


Jerk Chicken with Mango Salsa
Adapted from recipes by Ellie Krieger and Emeril Lagasse
Ingredients:
4 scallions, trimmed and coarsely chopped
½ -1 habenero or scotch bonnet pepper (depends on how spicy you want it)
2 large garlic cloves, peeled and roughly chopped
1 teaspoon freshly ground ginger (not the dried stuff you find in the spice aisle)
4 TBL lime juice
2 TBL soy sauce
1 TBL brown sugar
1 teaspoon pumpkin pie spice
1 teaspoon dried thyme
2 chicken breasts
2 mangoes, pitted and diced
½ red onion, finely diced
½ red pepper, diced
½ cucumber, peeled and diced
1 teaspoon lime zest
Salt and pepper
1.Combine scallions, habenero pepper, garlic, ginger, 2 TBL lime juice, soy sauce, brown sugar, pumpkin pie spice, and thyme in a blender until you have a smooth paste. Pour over chicken breasts and marinate for 8 hours or overnight.
2.To make salsa, combine mango, red onion, red pepper, cucumber, remaining 2 TBL lime juice, and lime zest in a bowl. Add salt and pepper to taste.
3.Remove chicken from marinade and broil or grill (about 5-6 minutes per side or more depending on thickness). Serve with mango salsa.
If you are unfamiliar with the dish, the “jerk” in jerk chicken is a marinade with a wonderful mix of sweet/fruity and spicy flavors. Be sure to marinate the chicken for a good long while so it can soak up all the flavors (if my chicken had been thawed I would have done so overnight but instead I settled for 8 hours during the day yesterday). Served with mango salsa and some corn on the cob, you have a fantastic summery meal.


Jerk Chicken with Mango Salsa
Adapted from recipes by Ellie Krieger and Emeril Lagasse
Ingredients:
4 scallions, trimmed and coarsely chopped
½ -1 habenero or scotch bonnet pepper (depends on how spicy you want it)
2 large garlic cloves, peeled and roughly chopped
1 teaspoon freshly ground ginger (not the dried stuff you find in the spice aisle)
4 TBL lime juice
2 TBL soy sauce
1 TBL brown sugar
1 teaspoon pumpkin pie spice
1 teaspoon dried thyme
2 chicken breasts
2 mangoes, pitted and diced
½ red onion, finely diced
½ red pepper, diced
½ cucumber, peeled and diced
1 teaspoon lime zest
Salt and pepper
1.Combine scallions, habenero pepper, garlic, ginger, 2 TBL lime juice, soy sauce, brown sugar, pumpkin pie spice, and thyme in a blender until you have a smooth paste. Pour over chicken breasts and marinate for 8 hours or overnight.
2.To make salsa, combine mango, red onion, red pepper, cucumber, remaining 2 TBL lime juice, and lime zest in a bowl. Add salt and pepper to taste.
3.Remove chicken from marinade and broil or grill (about 5-6 minutes per side or more depending on thickness). Serve with mango salsa.
Subscribe to:
Posts (Atom)