Man-- I just can't catch a break!!! You would have thought after yesterday's issues that today might be better. You thought wrong.
This is week four of my seven consecutive weeks of traveling. Today I was supposed to have a nice non-stop flight to Phoenix (with an aisle seat) that would get me in early enough to walk around, enjoy the warm weather, and see some of what Phoenix/Scottsdale has to offer. That was the plan...was being the operative word there.
My flight was canceled this morning due to maintenance issues. I am not sure whether to be grateful that I did not get on a broken airplane or skeptical as to whether that was really the issue given that I was first notified of a potential delay at 9pm last night....if there was a maintenance issue couldn't they have fixed the problem in the 13 hours between then and my scheduled flight???? Now I have to change planes in Charlotte, will be stuck in a middle seat, and won't get there until 6pm PST. Oh and the weather forecast for tomorrow-- a high of 57 and rain.
It's official....work travel SUCKS! Keep your fingers crossed that my remaining travel plans are on time and smooth sailing...
Wednesday, March 31, 2010
One of Those Days
Ever had one of those days where nothing seems to go quite according to plan? Where it seems like you take a step forward only to take three steps back a moment later? We’ve all been there, right?! Well yesterday was one of those days for me. As Jason so sweetly noted after I dropped the blender on the floor right before I was going to use it to finish making dinner—I was really “off my game” yesterday. It all started with the tell tale sign that the lovely spring pollen was starting to get to me—a scratchy throat. As soon as I woke up I could feel it and, as a result, I felt off all day. Work was busier than I expected. I wasn’t able to go to the gym or run an errand during my lunch hour as I had planned. (And an unexpectedly long conference call prevented me from going as soon as work was over too.) Then there was the issue of having two tons of laundry to do, packing for a business trip, and needing to write overdue thank you notes to family members for their thoughtful birthday gifts. Not to mention those Cadbury Mini Eggs that somehow found their way into our apartment and are trying their darndest to throw me of my quest to get more fit.
But it really all hit the fan when it came time to make dinner. In my effort to go lighter, I had decided to make Ellie Krieger’s Pasta with Creamy Red Pepper Sauce. It’s a tasty recipe that is low in fat and full of flavor. I’ve made it several times so it should have been a cinch to pull together. Unfortunately, I somehow found myself without several key ingredients…..despite having consulted the recipe when making the grocery list on Sunday! First, I realized I did not have an onion. No big deal, I thought, I have half of a red onion in the fridge leftover from a couple of days ago. Crisis averted. Or so I thought until I got the box of penne I was planning to use out of the cupboard and realized there was hardly enough pasta left in there for one person, let alone two... I could have sworn it was half full a few days ago. Apparently not.
I called Jason to see if he could stop by the grocery store to pick some penne up on his way home. The bad news was he was already pulling in the garage when I called. The good news was that the (over-priced) convenience store downstairs had penne in stock—multi-grain no less! Just when I thought the worst was over, I dropped the aforementioned blender. Actually, the base was not screwed on as tight to the vessel (or whatever the proper name for the glass part of a blender is) and it fell off as I was moving it over to the counter. Fortunately, it wasn’t broken. All I had to do was pop a piece back into place and it worked like a charm.
Despite all the setbacks, the penne with creamy red pepper sauce turned out well. But to be honest, I did not enjoy it half as well as the glass of wine I had with it!


Penne with Creamy Red Pepper Sauce
Adapted from Ellie Krieger
Ingredients:
2 TBL olive oil
½ red onion, chopped
2 to 3 garlic cloves, peeled and chopped
1 (12-ounce) jar roasted red peppers, drained, rinsed, and chopped
½ cup low-sodium chicken stock or vegetable stock
4 oz crumbled feta cheese
Half a pound of penne (multigrain, regular or a combo thereof)
Salt and pepper
¼ cup chopped fresh parsley leaves
1.Bring pot of water to boil. Cook pasta according to package directions.
2.Heat the oil in a skillet over medium-high heat. Add onions and garlic and sauté until soft about 5 minutes. Add roasted pepper and heat through.
3.Place mixture in blender or food process with feta and broth and process until smooth.
4.Drain pasta and mix with red pepper sauce. Add salt and pepper to taste. Stir in parsley and serve.
Tuesday, March 30, 2010
Battling the Newlywed Nine
When Jason and I got married last fall I was in decent shape. Not the best shape of my life, but certainly not the worst. I was eating pretty healthy, working out 4-5 times a week and feeling pretty good about myself. Unfortunately, once the wedding was over I fell off the wagon to a certain degree and have experienced some newlywed weight gain. This is not terribly unusual, from what I can tell. According to research, individuals in long-term relationships are more likely to gain weight than their single counterparts. This can be for a variety of reasons—complacency, eating more (when cooking for two or eating out more often than when you were solo), staying in instead of going out, etc. The biggest issue for me, I think, is that I have completely lost my exercise routine (which even more recent research has shown is critical to preventing weight gain in women as we age). And early on in our marriage I was so excited about cooking for my new husband on a regular basis I tended to go overboard, making more luxurious dishes and desserts than were necessary. So my goals for the second half of our year as newlyweds are to 1) get back into a good workout routine, 2) incorporate more vegetarian/salad based meals into our diets, and 3) eat smaller portion sizes (because Jason and I should not be eating the same amount of food!) Hopefully by putting it out there, you all will help keep me accountable—if you see too many decadent dishes on this blog, feel free to call me out!
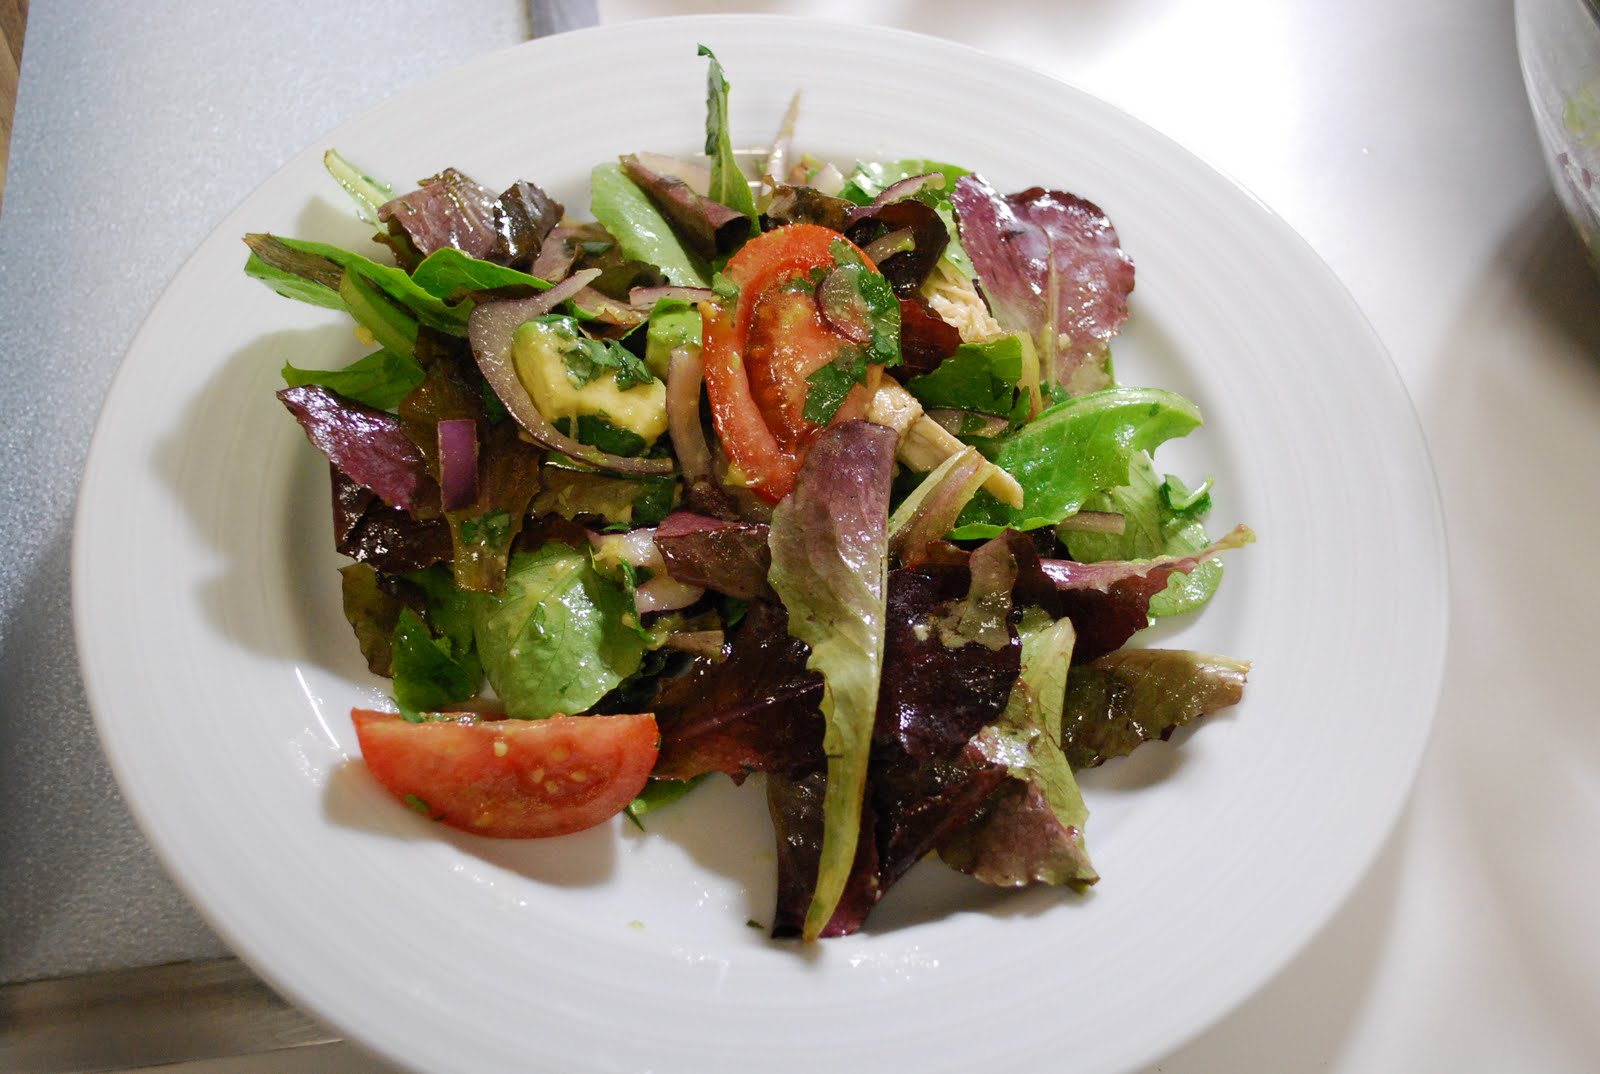
To help get things started on the right foot, I decided to make a big salad for dinner last night. This particular salad happens to be a family favorite. It includes roasted beets (which we happen to eat a lot of around here despite that fact that apparently the public does not), pecans, and goat cheese (which tends to be lower in fat and calories than cow’s milk cheese). To round it out, I added some left over roast chicken from last night’s dinner and a quick mustard/white balsamic vinaigrette. Healthy and delicious!


Roasted Beet Salad with Pecans and Goat Cheese
Ingredients:
3 golden or red beets or combination thereof (I used golden this time because they don’t bleed as much as the red beets do)
Salad greens
2 oz goat cheese, crumbled
¼ cup of chopped pecans (more or less depending on your own taste, can also use walnuts or pine nuts)
3 cups of salad greens (we used baby romaine)
1/3 cup of shredded roast chicken (optional)
2 Teaspoons of Dijon mustard
1 TBL white balsamic vinegar
3 TBL olive oil
Salt and pepper
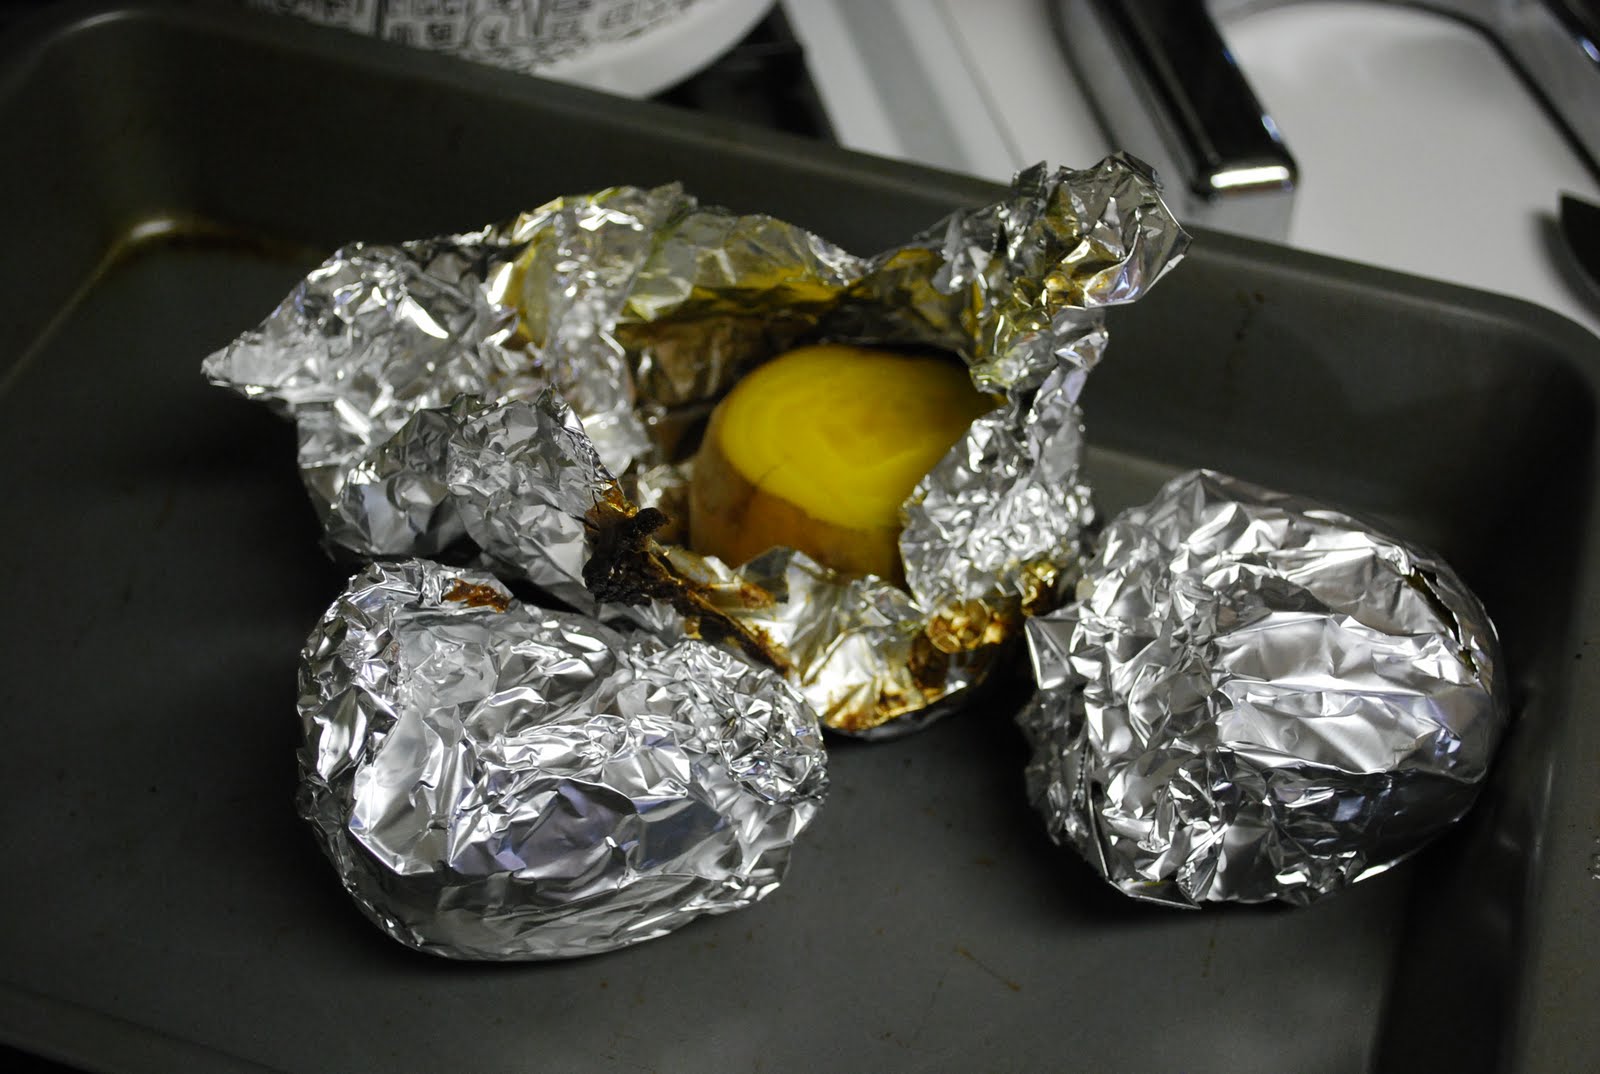
1.To roast your beets, preheat oven to 450 degrees. Wrap each beet individually with aluminum foil and place on rimmed baking sheet. Roast until beets are tender, about 45 minutes. Open aluminum foil and let beets cool until able to handle. Rub the beet between the aluminum foil to remove skins. Cut into chunks.
2.Place salad greens in large serving bowl. Add beets, pecans, crumbled goat cheese, and chicken if using.
3.Make dressing by whisking vinegar and mustard together. Slowly stream in olive oil and whisk until emulsified. Add salt and pepper to taste.
4.Toss dressing (as much as you like) with salad and serve.
To help get things started on the right foot, I decided to make a big salad for dinner last night. This particular salad happens to be a family favorite. It includes roasted beets (which we happen to eat a lot of around here despite that fact that apparently the public does not), pecans, and goat cheese (which tends to be lower in fat and calories than cow’s milk cheese). To round it out, I added some left over roast chicken from last night’s dinner and a quick mustard/white balsamic vinaigrette. Healthy and delicious!


Served with crescent rolls because you gotta have a little bit of carbs (plus they're Jason's favorites!)
Roasted Beet Salad with Pecans and Goat Cheese
Ingredients:
3 golden or red beets or combination thereof (I used golden this time because they don’t bleed as much as the red beets do)
Salad greens
2 oz goat cheese, crumbled
¼ cup of chopped pecans (more or less depending on your own taste, can also use walnuts or pine nuts)
3 cups of salad greens (we used baby romaine)
1/3 cup of shredded roast chicken (optional)
2 Teaspoons of Dijon mustard
1 TBL white balsamic vinegar
3 TBL olive oil
Salt and pepper
1.To roast your beets, preheat oven to 450 degrees. Wrap each beet individually with aluminum foil and place on rimmed baking sheet. Roast until beets are tender, about 45 minutes. Open aluminum foil and let beets cool until able to handle. Rub the beet between the aluminum foil to remove skins. Cut into chunks.
2.Place salad greens in large serving bowl. Add beets, pecans, crumbled goat cheese, and chicken if using.
3.Make dressing by whisking vinegar and mustard together. Slowly stream in olive oil and whisk until emulsified. Add salt and pepper to taste.
4.Toss dressing (as much as you like) with salad and serve.
Monday, March 29, 2010
Taking Cookbooker Out for a Spin
I came across a new and interesting site today during the course of my daily blog reading: Cookbooker. The purpose of Cookbooker is to more easily keep track of cookbook and magazine recipes as well as to give you an opportunity to review/rate specific recipes and discuss them with others. After perusing TheKitchn's (where I first heard about it) nice summary of the site’s features, I decided to check it out for myself.

The first thing you are asked to do once you sign up (but don’t worry it is free!) is to add cookbooks, magazines, and/or websites that you use. To test it out I entered one of my go-tos: Ina Garten's (duh!) Barefoot Contessa at Home. Once I did, I found out that 47 other members also have this book on their “bookshelf” and that seven recipes from the book had been rated/reviewed. Clicking on each of the recipes listed allowed me to see what people had to say about them. You also have the option of entering other recipes from the book which you can then review, rate (using a 1-5 star system), make comments/suggestions or ask questions, or even just index it for your own personal use. You can also browse books/magazines/websites that others have added (as well as the recipes contained therein) as well.

I can definitely see the appeal of this type of site and think the ability to search for reviews around specific recipes is probably the best thing about it. I can see it being helpful if you are looking for a sure fire hit or interested in how well a given recipe may actually turn out. But as TheKitchn pointed out this is not a recipe database per se in that it does not include actual recipes. You either need to have the book/magazine/etc. already in your possession or will have to find it elsewhere. (Also-- in the little bit of looking I did today, the recipe review were mainly "awesome" or "would make this again" which is not the level of information I'd be looking for. BUT it is new and I am sure the comments will evolve as more users participate. Also, I did not look extensively at reviews for every book/recipe so there might be more there than I initially saw.)
It is also billed as an opportunity to keep track of your recipes themselves (which book/magazine they came from, page number, etc) as well as any modifications/substitutions you may make to them. While this is certainly a useful service, I actually have my own method of doing this—a little notebook that I keep in the kitchen at all times and use to make all kinds of notations for individual recipes. From page numbers to cooking times to whether or not we liked the recipe, it’s all in there. It’s low tech, but it is an easy way to keep track of what you are doing while you are actually cooking.

I guess you could make these real-time notations via Cookbooker on a computer as well but I am not about to bring my pretty Sony Vaio into an already cramped kitchen if I can help it (talk about a recipe for disaster!). However, I’d like to see how useful the online community aspect of the site is so I am going to give it a try—I’ll let you know!
The first thing you are asked to do once you sign up (but don’t worry it is free!) is to add cookbooks, magazines, and/or websites that you use. To test it out I entered one of my go-tos: Ina Garten's (duh!) Barefoot Contessa at Home. Once I did, I found out that 47 other members also have this book on their “bookshelf” and that seven recipes from the book had been rated/reviewed. Clicking on each of the recipes listed allowed me to see what people had to say about them. You also have the option of entering other recipes from the book which you can then review, rate (using a 1-5 star system), make comments/suggestions or ask questions, or even just index it for your own personal use. You can also browse books/magazines/websites that others have added (as well as the recipes contained therein) as well.

My cookbook collection-- it needs some organizing!!
I can definitely see the appeal of this type of site and think the ability to search for reviews around specific recipes is probably the best thing about it. I can see it being helpful if you are looking for a sure fire hit or interested in how well a given recipe may actually turn out. But as TheKitchn pointed out this is not a recipe database per se in that it does not include actual recipes. You either need to have the book/magazine/etc. already in your possession or will have to find it elsewhere. (Also-- in the little bit of looking I did today, the recipe review were mainly "awesome" or "would make this again" which is not the level of information I'd be looking for. BUT it is new and I am sure the comments will evolve as more users participate. Also, I did not look extensively at reviews for every book/recipe so there might be more there than I initially saw.)
It is also billed as an opportunity to keep track of your recipes themselves (which book/magazine they came from, page number, etc) as well as any modifications/substitutions you may make to them. While this is certainly a useful service, I actually have my own method of doing this—a little notebook that I keep in the kitchen at all times and use to make all kinds of notations for individual recipes. From page numbers to cooking times to whether or not we liked the recipe, it’s all in there. It’s low tech, but it is an easy way to keep track of what you are doing while you are actually cooking.

My little black book of recipes/cooking
I guess you could make these real-time notations via Cookbooker on a computer as well but I am not about to bring my pretty Sony Vaio into an already cramped kitchen if I can help it (talk about a recipe for disaster!). However, I’d like to see how useful the online community aspect of the site is so I am going to give it a try—I’ll let you know!
Sunday, March 28, 2010
Sunday Dinner: Roast Chicken Edition
When it came to planning this week’s Sunday Dinner (which you may recall is often the most elaborate/time consuming meal of the week in our house), I could only think of one thing—roast chicken. I am not sure why, but for some reason I got the idea in my head and that was that. I took the fact that Jason didn’t think my sudden desire to cook a whole bird was odd as a good sign and decided to go for it.
After consulting a couple of cookbooks I thought “how hard can this be?” and decided to wing it (no pun intended). I made a compound butter with tarragon and thyme and massaged it both underneath and on top of the skin. I put the chicken in a hot cast iron pan along with some new potatoes and stuck it in a pretty hot oven. In order to ensure maximum flavor, I made a little glaze of Dijon mustard and honey and basted the chicken a couple of times about halfway through the cooking process.


It was pretty darn good if I do say so myself. The chicken was incredibly moist and the potatoes (which cooked up with the chicken drippings) were full of flavor. I served it with a zucchini dish from this month’s Everyday Food. The most difficult part was dealing with the overly sensitive smoke detector in our apartment which goes off pretty much anytime the oven is heated above 400 degrees (reason # 92 why I can’t wait to get out of this place).

Roast Chicken with Herbs and Mustard Glaze
Inspired by recipes from Martha Stewart, America’s Test Kitchen and Mark Bittman
Ingredients:
1 (3-4 lb) whole chicken
4 TBL butter, softened
1 TBL (total) chopped tarragon and thyme
Salt and Pepper
1 lb new potatoes, cut in half
2 TBL Dijon mustard
1 TBL honey
1.Place cast iron pan in oven and preheat to 450 degrees. Mix butter with herbs, salt, and pepper.
2.Rinse chicken (inside and out) under cool tap water and pat dry. Generously salt and pepper the inside and outside of the chicken. Using your fingers, loosen the skin of the chicken from the breasts. Spread about half of the herb butter underneath the skin and smooth it all around. Take half of the remaining butter and place it in the cavity. Massage the final bit of butter all over the skin.
3.Remove the cast iron pan and place the chicken, breast side up, in the middle. Scatter the potatoes around the outside. Place the chicken and potatoes in oven.
4.While the chicken is roasting, mix together mustard and honey. I thinned it out with about 1 TBL of water so it would go on a bit easier.
5.After about 30 minutes, baste the chicken with the glaze. Continue to baste every 5-10 minutes until the chicken is done (about 55 minutes from start to finish). Make sure that a thermometer inserted at thickest part of the thigh reaches 165 degrees.
6.Remove chicken to a cutting board, tent with foil and let rest for about 10 minutes. Carve and serve.
Zucchini with Lemon and Thyme
Adapted, just barely, from Everyday Food
Ingredients:
3 medium zucchini, cut into large pieces
4 teaspoons olive oil
Salt and pepper
Juice from 1 lemon
1 teaspoon fresh thyme leaves, chopped
1.Heat 2 teaspoons of olive oil over medium-high heat. Add half the zucchini and toss to coat in oil. Season with salt and pepper and cook until golden brown in spots, about 4 minutes.
2.Transfer zucchini to a serving bowl and repeat with remaining oil and zucchini.
3.Stir batches together and add lemon juice and thyme. Season with salt and pepper.
Cultivating Common Interests
You know what they say:
The couple that plays together….


…stays together.
The couple that plays together….

Hiking (Old Rag circa 2007)

Snorkeling (in Aruba)

Playing mini golf (usually when with my parents)

Kayaking (last week in South Carolina)
…stays together.
Friday, March 26, 2010
Super Salad
Back when Jason used to occasionally make dinner for me, he stumbled upon what happens to be one of the best salad recipes there is: Avocado Salad with Tomatoes, Lime, and Toasted Cumin Vinaigrette. It is one of our go-to meals at any time of the year but is a particularly good choice now that Spring has sprung. Also we are in detox mode after spending the better part of the last week overindulging in tasty (and mostly fried) seafood while on vacation in South Carolina, so salad seemed an appropriate choice.
The salad itself is nothing terribly unusual/special—salad greens, tomatoes, red onions, cilantro, and avocado. But the dressing! The dressing is what makes this the best salad ever. It brings all the flavors together in delicious harmony. It does require a couple of “specialized ingredients” (e.g., things that you may not have just hanging out in your pantry on a regular basis—I know I didn’t until we discovered this salad): cumin seeds and rice wine vinegar. But they are pretty easy to find and last a good while so you will be able to make this salad again and again and again.
Even better-- it is a breeze to make. This is a good thing when you are still adjusting to post-vacation life and need to make your apartment spotless for the in-laws who are coming by tomorrow.


Avocado Salad with Tomatoes, Lime, and Toasted Cumin Vinaigrette
Adapted, just barely, from Bobby Flay
Ingredients:
¼ cup fresh lime juice (about 3 juicy limes)
2 TBL rice wine vinegar
1 TBL honey
1 TBL cumin seeds, lightly toasted*
½ cup chopped cilantro**
¼ cup olive oil
¼ vegetable oil
2-3 medium tomatoes, cut into chunks (can also use cherry tomatoes, halved)
1-2 ripe avocados (depending on how many people you are feeding and how much you like avocados), cut into chunks
1 small or ½ large red onion, thinly sliced
2 cups of salad greens (we either use arugula or baby romaine depending on how we’re feeling)
1 teaspoon ground cumin
*To toast the cumin seeds, pour into a dry pan and heat over low. Give them a shake every now and then until you can start to smell the cumin aroma.
**A note about cilantro-- it can be very sandy/gritty, so I find that the best way to get it thoroughly clean is to use my leek washing method: fill a bowl with cool water, add cilantro leaves, and stir it around a time or two. The sand/grit will fall to the bottom.
1.Make the vinaigrette. Whisk together the lime juice, vinegar, honey, cumin, and half the cilantro in a medium bowl. Gradually whisk in the oils until emulsified. Or you can do what we do and put everything into a mason jar and give a good shake. Season with salt and pepper, to taste.
2.Toss the salad greens, tomatoes, onions, and avocado with half of the vinaigrette. Check for seasoning. Sprinkle with ground cumin and the remaining cilantro. Serve, adding remaining vinaigrette as necessary. You can also add some diced chicken to the mix like we did if you want to give it a little more substance!
Thursday, March 25, 2010
Simple Things
The first day back from vacation is always the worst. I think we can all agree on that. It's one of those universal truths in life. But I think that this fact is most evident when:
Tomorrow. Is. Friday.
Yep. That pretty much covers it.
- your first day back is also a work day
- your flight the night before was two hours late getting home which means the only unpacking you accomplished before passing out was finding your pjs and tooth brush
- you woke up to remember that you had little food left in the apartment and had to scrounge up something for you and your husband to eat for breakfast
- you are so busy catching up from the last three and a half days of work you missed that you barely have time to shower let alone make something tasty for book club (which also happens to be your first day back)
- Jason’s netbook (which allowed me to go through most of my 120+ work emails last night while sitting in the airport for almost 3 hours making this morning that much easier to get through)
- Quaker instant oatmeal
- hummus and pita chips
- the fact that tomorrow is Friday
Tomorrow. Is. Friday.
Yep. That pretty much covers it.
Tuesday, March 23, 2010
Wish You Were Here
I could get used to this.


Regularly scheduled posts to resume in a day or two....if when we come home.


Regularly scheduled posts to resume in a day or two....
Saturday, March 20, 2010
Letting Go
Jason and I are hightailing it out of here for a few days of rest and relaxation with family and friends in South Carolina. I am looking forward to this trip for many reasons, not the least of which is because I don’t have to do anything to plan for it. Ok, so I did most of the travel planning—i.e. researching airfares and rental cars. But other than that I am just along for the ride. This is a big change of pace for me when it comes to taking trips.
Hi, my name is Lindsay and I am planner. While this is true in my day-to-day life (which I am sure Jason would be more than happy to attest to) it is even more evident when it comes to traveling.
I am a pretty Type A person. I like itineraries and agendas. I like to know where I am going and what I am going to do when I get there. I also enjoy doing new things and seeing new places and when I am there, I want to make the most of it.

The first thing I usually do once a trip has been confirmed is to buy a guidebook (or two or three) and figure out where I want to go and what I want to do there. Lately it has gotten to the point where I color code particular activities with these handy-dandy post it flags. (While seemingly anal retentive, it actually makes for easy reference when you are out and about and need restaurant ideas in a certain neighborhood on the fly.)
 Jason is not much of a planner. I think he would be happy to just fire up the netbook and figure out where to go and what to do once we got there. But, to me, that is just wasting precious time in a place you may never visit again! I can understand where he is coming from though, planning every minute of your trip can eliminate a certain level of spontaneity. And I also have a tendency to over schedule. On our honeymoon, for example, we spent more time on the go visiting every corner of Kauai then we did sitting on a beach (tropical drink in hand) and enjoying our first few days of wedded bliss. But at least we saw every inch of the place!

While I enjoy planning trips and the satisfaction it brings when I check all those places off my internal list of things to see/do, it can be exhausting. So it is really nice when you can kick back and let someone else take the wheel. Which is why I look forward to our annual SC trip. It is familiar. It is comforting. And it really allows me to let go and enjoy the ride.
Hi, my name is Lindsay and I am planner. While this is true in my day-to-day life (which I am sure Jason would be more than happy to attest to) it is even more evident when it comes to traveling.
I am a pretty Type A person. I like itineraries and agendas. I like to know where I am going and what I am going to do when I get there. I also enjoy doing new things and seeing new places and when I am there, I want to make the most of it.

Part of my guidebook collection
The first thing I usually do once a trip has been confirmed is to buy a guidebook (or two or three) and figure out where I want to go and what I want to do there. Lately it has gotten to the point where I color code particular activities with these handy-dandy post it flags. (While seemingly anal retentive, it actually makes for easy reference when you are out and about and need restaurant ideas in a certain neighborhood on the fly.)


You can see the color coded flags...blue was water-based activities, orange was restaurants, etc.
While I enjoy planning trips and the satisfaction it brings when I check all those places off my internal list of things to see/do, it can be exhausting. So it is really nice when you can kick back and let someone else take the wheel. Which is why I look forward to our annual SC trip. It is familiar. It is comforting. And it really allows me to let go and enjoy the ride.
Friday, March 19, 2010
Count Me In
Like many of you, we received the 2010 Census in the mail the other day. For some reason, I found myself really excited about it. Maybe because it was the first time I received one to fill out and it made me feel a weird sense of importance. Maybe it was because as a newlywed it was the first time I was being officially asked about my new family. Maybe it was because I truly enjoy doing my civic duty.

I don’t know…maybe I am just weird.

Regardless of the reason, I was excited. But I have to say now that I have filled it out and mailed it back in…it was kind of a letdown.

I don’t know what I was expecting it to ask (given that it is, in fact, designed to ascertain the number of persons living in a particular residence) but I thought it would be more than just name, gender, and race/ethnicity.
Oh well. At least I can sleep tonight knowing I, in my own small way, was a part of the process. That I am being counted.

I don’t know…maybe I am just weird.

Nothing says "I am the government and I am here to help" like the threat of legal retribution!
Regardless of the reason, I was excited. But I have to say now that I have filled it out and mailed it back in…it was kind of a letdown.

I don’t know what I was expecting it to ask (given that it is, in fact, designed to ascertain the number of persons living in a particular residence) but I thought it would be more than just name, gender, and race/ethnicity.
Oh well. At least I can sleep tonight knowing I, in my own small way, was a part of the process. That I am being counted.
Thursday, March 18, 2010
Being a Top Chef at Home
First, an update: I did see the Chicago River yesterday but, alas, it was not all that green. I guess the official St. Patrick’s Day festivities took place last weekend (so the city could party hard without having to go to work the next day I guess) and it had faded considerably since then. Also, I lied when I said I was wearing festive socks…they just were not appropriate work attire given the shoes I decided to wear yesterday. But, never fear, Jason rocked his shamrock socks so at least one member of our family was getting in the spirit of things!
As you may recall my birthday gifts this year included the Top Chef Quickfire Cookbook. When planning out the menu/grocery list for this week I decided to try out one of its recipes and landed on Season 4 cheftestant Antonia’s Poached Egg Salad. I was drawn to it for two reasons—1) it includes mushrooms which you all know I love (although I promise that the next three recipes at least will NOT include mushrooms as a primary ingredient) and 2) it includes poached eggs which I have become somewhat obsessed with of late. The other reason was that I had a really amazing warm mushroom and poached egg salad a few months ago at Talulla and I wanted to see if this would be a way of recreating it at home.


I made a number of substitutions to the recipe as written because, unlike the cheftestants on the show, I do not have anything and everything at my disposal in terms of ingredients and I did not want to spend a ridiculous amount of money buying them all. So instead of chervil, I used parsley. Instead of mache, I used baby romaine. And I nixed the squash blossoms altogether.
But I did include one somewhat unusual ingredient included in the recipe—sunchokes. According to the package they came in, sunchokes are the tuber from the sunflower…and “have the nutty flavor of a potato, jicama, and an artichoke. They can be eaten raw, prepared like a potato, or sautéed and served with fresh herbs.” As you can see from the picture they look like small, knobby potatoes. But they are a bit softer (and therefore harder to peel) than the average potato.

This recipe, though seemingly simple, has a lot of a steps and took a little longer than I expected. I did realize that I need to work on my egg-poaching skills though. Not so pretty. And I think I left half the egg whites in the pot! But all in all it was pretty good. Jason gave it two thumbs up, saying “it’s hard to go wrong with bacon and mushrooms.”
Truer words have never been spoken.

Antonia’s Poached Egg Salad
Adapted from Top Chef: The Quickfire Cookbook
Ingredients:
4 strips bacon, cut into ¼ inch pieces
½ pound of wild mushrooms (I used a pre-sliced stir-fry mix from the local grocery store)
½ pound of sunchokes, peeled and diced
Salt and pepper to taste
2 teaspoons red wine vinegar
2 large eggs
1 teaspoon Dijon mustard
Olive oil
1 small bunch chives, chopped
¼ cup of flat leaf parsley, chopped
4 cups of baby romaine or other small leaf lettuce
1.In a large sauté pan over medium-low heat, slowly crisp the bacon. Using a slotted spoon, transfer to a plate lined with paper towels to drain. Pour off and reserve bacon fat, leaving enough in the pan to sauté the mushrooms. Add the mushrooms to the pan and increase heat to medium. Saute until soft, about 3-5 minutes. Transfer to a medium bowl.
2. Add some olive oil to the pan if necessary and then add the sunchokes. Saute over medium heat until tender about 5-7 minutes. Add to the mushrooms and season with salt and pepper.
3.Meanwhile poach the eggs. Bring a quart of water and 1 teaspoon of vinegar to a slow boil over high heat. Crack the egg, one at a time, into a small bowl. When the water boils, reduce heat to simmer. Stir water counterclockwise until it swirls, then carefully add 1 egg to the moving water. Simmer gently until the whites are firm, about 1-2 minutes. Remove with a slotted spoon and let drain on a paper towel until ready. Repeat with the second egg.
4.Combine the bacon fat, vinegar, and Dijon mustard. Slowly whisk in olive oil until the dressing has emulsified.
5.To assemble, mix mushrooms and sunchokes with parsley, chives, and bacon. In another bowl toss lettuce with dressing. Divide lettuce among two plates. Top with mushroom/sunchoke mixture and a poached egg.
As you may recall my birthday gifts this year included the Top Chef Quickfire Cookbook. When planning out the menu/grocery list for this week I decided to try out one of its recipes and landed on Season 4 cheftestant Antonia’s Poached Egg Salad. I was drawn to it for two reasons—1) it includes mushrooms which you all know I love (although I promise that the next three recipes at least will NOT include mushrooms as a primary ingredient) and 2) it includes poached eggs which I have become somewhat obsessed with of late. The other reason was that I had a really amazing warm mushroom and poached egg salad a few months ago at Talulla and I wanted to see if this would be a way of recreating it at home.


I made a number of substitutions to the recipe as written because, unlike the cheftestants on the show, I do not have anything and everything at my disposal in terms of ingredients and I did not want to spend a ridiculous amount of money buying them all. So instead of chervil, I used parsley. Instead of mache, I used baby romaine. And I nixed the squash blossoms altogether.
But I did include one somewhat unusual ingredient included in the recipe—sunchokes. According to the package they came in, sunchokes are the tuber from the sunflower…and “have the nutty flavor of a potato, jicama, and an artichoke. They can be eaten raw, prepared like a potato, or sautéed and served with fresh herbs.” As you can see from the picture they look like small, knobby potatoes. But they are a bit softer (and therefore harder to peel) than the average potato.

This is what sunchokes look like.
This recipe, though seemingly simple, has a lot of a steps and took a little longer than I expected. I did realize that I need to work on my egg-poaching skills though. Not so pretty. And I think I left half the egg whites in the pot! But all in all it was pretty good. Jason gave it two thumbs up, saying “it’s hard to go wrong with bacon and mushrooms.”
Truer words have never been spoken.

Antonia’s Poached Egg Salad
Adapted from Top Chef: The Quickfire Cookbook
Ingredients:
4 strips bacon, cut into ¼ inch pieces
½ pound of wild mushrooms (I used a pre-sliced stir-fry mix from the local grocery store)
½ pound of sunchokes, peeled and diced
Salt and pepper to taste
2 teaspoons red wine vinegar
2 large eggs
1 teaspoon Dijon mustard
Olive oil
1 small bunch chives, chopped
¼ cup of flat leaf parsley, chopped
4 cups of baby romaine or other small leaf lettuce
1.In a large sauté pan over medium-low heat, slowly crisp the bacon. Using a slotted spoon, transfer to a plate lined with paper towels to drain. Pour off and reserve bacon fat, leaving enough in the pan to sauté the mushrooms. Add the mushrooms to the pan and increase heat to medium. Saute until soft, about 3-5 minutes. Transfer to a medium bowl.
2. Add some olive oil to the pan if necessary and then add the sunchokes. Saute over medium heat until tender about 5-7 minutes. Add to the mushrooms and season with salt and pepper.
3.Meanwhile poach the eggs. Bring a quart of water and 1 teaspoon of vinegar to a slow boil over high heat. Crack the egg, one at a time, into a small bowl. When the water boils, reduce heat to simmer. Stir water counterclockwise until it swirls, then carefully add 1 egg to the moving water. Simmer gently until the whites are firm, about 1-2 minutes. Remove with a slotted spoon and let drain on a paper towel until ready. Repeat with the second egg.
4.Combine the bacon fat, vinegar, and Dijon mustard. Slowly whisk in olive oil until the dressing has emulsified.
5.To assemble, mix mushrooms and sunchokes with parsley, chives, and bacon. In another bowl toss lettuce with dressing. Divide lettuce among two plates. Top with mushroom/sunchoke mixture and a poached egg.
Wednesday, March 17, 2010
Happy St. Patrick's Day!
I hope the luck of the Irish is with me as I head to Chicago today. I wish I could say I was heading there just to see the Chicago River dyed green but unfortunately, I have to present at a conference instead. But as is customary in my family, I will be wearing some festive socks to honor the occasion!

Happy St. Patrick's Day!

Chicago River Dyed Green--courtesy of Wikipedia
Happy St. Patrick's Day!
Tuesday, March 16, 2010
Spicing Things Up
I generally find Tuesdays to be sort of “blah." They are not as bad as Mondays (which pretty much always suck) but don’t have the “week is halfway over” excitement that Wednesdays do. Tuesdays are just kind of there. This week I decided to try and liven Tuesday up with a tasty dinner. I think Shrimp Fra Diavolo translates to “shrimp of the devil” or something like that. And that is a pretty apt description given the heat this dish has going on.
I have made this particular recipe a number of times over the years, experimenting with it until I got it almost exactly where Jason and I wanted it. My first addition was the mushrooms. If you haven’t figured it out yet, Jason and I are big fans of fungi….we could pretty much eat mushrooms on anything. But I honestly think the addition of the mushrooms makes the dish a lot more interesting than it would be otherwise. Next I added the orzo. Jason and I are fans of another, more summery shrimp and orzo salad so I decided to see how the orzo would work here. Oh, it definitely works!
I’m thinking that next time around I might add some baby spinach (thrown in at the end) to give the plate some additional green and increase the nutritional value. But overall, I’d recommend this as a quick and tasty meal that is sure to spice up any day of the week.


Shrimp Fra Diavolo
Adapted from Giada De Laurentiis
Ingredients:
8 ounces of orzo pasta
1 1lb shrimp, peeled and deveined
1 teaspoon salt, plus additional as needed
1 teaspoon dried, crushed red pepper flakes (you can adjust depending on how spicy you like it!)
3 TBL olive oil, plus 1-2 teaspoons
1 medium onion, sliced
1 (8 ounce) package white button mushrooms, quartered
1 (14.5 ounce) can of diced tomatoes
1 cup dry white wine (get something you like so you can have a glass with dinner!)
3 garlic cloves, chopped
¼ teaspoon dried oregano or other herb mix (I use a Tuscan herb mix I got from somewhere)
¼ cup chopped basil
¼ cup chopped flat leaf parsley
1.Toss the shrimp in a medium bowl with 1 teaspoon of salt and red pepper flakes. I like to let this sit for 10-15 minutes (in the fridge) so the shrimp absorbs the flavors.
2.Heat 3 TBL olive oil in a large pan over medium-high heat. Add shrimp and sauté until just pink, about a minute or two per side (If anything, you might want to let the shrimp be undercooked a little bit—you’ll add them back to the heat at the end and there is nothing worse that rubbery, overcooked shrimp!) Transfer the shrimp to a bowl or plate and set aside.
3.Add onion and mushrooms to the same pan (you may want to add some additional olive oil if the pan looks dry), sauté until soft, about 5 minutes.
4.Add orzo to a pot of boiling water and cook for 10-11 minutes (or as per the instructions on the package).
5.Add the tomatoes with their juices, wine, garlic, and oregano/dried herbs. Simmer until most of the liquid evaporates, about 12-15 minutes.
6.Drain orzo and set aside.
7.Add shrimp and any accumulated juices to the pan and cook for a minute or two until shrimp are heated through and flavors have had a chance to meld.
8.Stir in basil and parsley and check for seasonings.
9.Add drained orzo to the pan and combine.
Monday, March 15, 2010
Trading Spaces
As you have probably gathered from previous posts, Jason and I are not yet homeowners. When we got married we decided that Jason would move into my one-bedroom apartment while we saved for a house. Now, six months in, I feel like the annoying child on a family car trip who is constantly asking “are we there yet?”
In other words, I am ready to upgrade to somewhere with a little more space.
Really ready.
I mean, come on….we live in a one-bedroom apartment. Granted it is a very large one bedroom apartment, but there is still not a whole lot of privacy or the ability to have true “alone time” when both of us are at home. This becomes really apparent during the occasional fight when you realize you can’t retreat to your respective corners to cool off because THERE IS NO WHERE TO GO. You either have to deal with the other person right then and there or you have to sit in the parking lot of Barnes and Noble and stew (you know, hypothetically speaking).
But even more problematic is the lack of storage space. It was a miracle that we were able to squeeze all of our stuff (both pre-wedding items as well as the deluge of things we received as part of the wedding) into this apartment. True story: the day that Jason finished moving the last of his stuff in and I realized how much we still had to put away I went into the bathroom (because there was nowhere else to be alone!), closed the door and cried for about 10 minutes. Then I came out and we figured out how to make it all work.
The kitchen is the worst. While most of the living space (e.g., bedroom, living room, dining room) is decently sized, the kitchen is pretty tiny.
And given that one side opens up to the dining room area, the number and size of cabinets are limited. This results in cabinets that look like this:


Oh and this:

I could go on and on and on.
Now I will admit I have more kitchen stuff than is probably necessary. But I like to cook so I obviously gravitate to these things (as do friends and family when they are looking for gift ideas). Could I do with less? Of course. But I don’t think wanting a larger kitchen is too much to ask. Especially when you have to resort to storing pantry staples on your countertops.

Or on top of the refrigerator.

But it’s not just the kitchen. Our closet is a total disaster (so bad, I am too embarrassed to show pictures of it publicly) and we have stuff piled EVERYWHERE. For example, if I had an extra closet I would put all of my gift wrapping paraphernalia (wrapping paper, gift bags, boxes, ribbons, etc.) in it. Instead it sits in a nook to the side of the dresser in our bedroom. (Note to my super-organized friend Stephanie-- feel free to look away from the next picture. It might make you feel sick!)

Even our tiny balcony has to be used for storage—fortunately Jason was able to figure out a creative (and space-saving) way to store his bike out there.

I would consider myself to be a fairly organized person who tries to keep things neat. But it’s getting more and more difficult to care. Often times I think: “What’s the point? This place is always going to be on the verge of being a disaster.”
It’s enough to drive a person crazy.
But I am hopeful. We have a plan in place and a timeline in mind. I just hope I can make it there without totally losing it.
In other words, I am ready to upgrade to somewhere with a little more space.
Really ready.
I mean, come on….we live in a one-bedroom apartment. Granted it is a very large one bedroom apartment, but there is still not a whole lot of privacy or the ability to have true “alone time” when both of us are at home. This becomes really apparent during the occasional fight when you realize you can’t retreat to your respective corners to cool off because THERE IS NO WHERE TO GO. You either have to deal with the other person right then and there or you have to sit in the parking lot of Barnes and Noble and stew (you know, hypothetically speaking).
But even more problematic is the lack of storage space. It was a miracle that we were able to squeeze all of our stuff (both pre-wedding items as well as the deluge of things we received as part of the wedding) into this apartment. True story: the day that Jason finished moving the last of his stuff in and I realized how much we still had to put away I went into the bathroom (because there was nowhere else to be alone!), closed the door and cried for about 10 minutes. Then I came out and we figured out how to make it all work.
The kitchen is the worst. While most of the living space (e.g., bedroom, living room, dining room) is decently sized, the kitchen is pretty tiny.

And given that one side opens up to the dining room area, the number and size of cabinets are limited. This results in cabinets that look like this:

One cabinet for food storage
And this:
One half-sized cabinet for spices and baking staples
Oh and this:

I could go on and on and on.
Now I will admit I have more kitchen stuff than is probably necessary. But I like to cook so I obviously gravitate to these things (as do friends and family when they are looking for gift ideas). Could I do with less? Of course. But I don’t think wanting a larger kitchen is too much to ask. Especially when you have to resort to storing pantry staples on your countertops.

Notice the vinegars and oils to the left of the coffee maker (we also have similar things next to the KitchenAid mixer that you may have noticed in a previous post)

But it’s not just the kitchen. Our closet is a total disaster (so bad, I am too embarrassed to show pictures of it publicly) and we have stuff piled EVERYWHERE. For example, if I had an extra closet I would put all of my gift wrapping paraphernalia (wrapping paper, gift bags, boxes, ribbons, etc.) in it. Instead it sits in a nook to the side of the dresser in our bedroom. (Note to my super-organized friend Stephanie-- feel free to look away from the next picture. It might make you feel sick!)

Even our tiny balcony has to be used for storage—fortunately Jason was able to figure out a creative (and space-saving) way to store his bike out there.

I would consider myself to be a fairly organized person who tries to keep things neat. But it’s getting more and more difficult to care. Often times I think: “What’s the point? This place is always going to be on the verge of being a disaster.”
It’s enough to drive a person crazy.
But I am hopeful. We have a plan in place and a timeline in mind. I just hope I can make it there without totally losing it.
Sunday, March 14, 2010
Lazy Sunday
Hectic work week + rainy weather = much needed low key weekend.
Jason and I have spent the last couple of days taking it easy and it has been really nice. I think we made it out of the apartment for all of an hour yesterday. We did a little better today—managing to squeeze in brunch with some friends and a trip to the grocery store (which was surprisingly empty for a Sunday—thank you Daylight Savings!) before coming home and relaxing. I capped the day with a Lost marathon while Jason spent some quality time in his green chair with a book.
I decided to go with the lazy Sunday flow and ease back into the kitchen with a fairly simple dinner—goat cheese chicken and cauliflower puree. Goat cheese chicken was one of the first things I ever made for Jason when we were dating and it remains a household favorite. It couldn’t be easier—slip a little goat cheese and basil underneath the skin of some chicken and roast until done. The hardest part is actually finding skin-on, bone-in chicken breasts! Since I didn’t feel like going to multiple stores today to try and find them, we ended up with chicken thighs instead and they worked just fine. It paired really well with the cauliflower puree—a light yet satisfying meal to close out the weekend.


Goat Cheese Chicken
Just barely adapted from Ina Garten
Ingredients:
2 bone-in, skin-on chicken breasts or thighs
1 4oz cylinder package of goat cheese, cut into 1/4 inch thick slices
Fresh basil leaves
Olive oil
Salt and Pepper
1.Preheat the oven to 375. Place chicken pieces on a sheet pan lined with aluminum foil or parchment paper (for easy clean up). Loosen the skin from the meat with your fingers.
2.Place 1 or 2 slices of goat cheese along with a large basil leaf (or two depending on the size) underneath the skin of each chicken breast/thigh.
3.Drizzle with olive oil and sprinkle with salt and pepper.
4.Bake chicken for 35-40 minutes (maybe less depending on size of chicken pieces you are working with) until the skin is slightly browned and chicken is cooked through.
Cauliflower Puree
Again, just barely adapted from The Kitchn
Ingredients:
1 small yellow onion, chopped
2 TBL olive oil
½ of medium cauliflower, cut into pieces
2 cloves of garlic, peeled
3 cups of milk
2 TBL butter
Salt and pepper to taste
1.Heat the olive oil in a large saucepan over medium heat. Add onion and sauté until soft, 2-3 minutes. Add cauliflower, garlic and milk. Season with salt and pepper
2. Bring to a boil, reduce heat and simmer (covered) until the cauliflower is tender (about 12-15 minutes). Be careful to reduce the heat to low otherwise the mixture might boil over!
3.Drain, reserving the liquid.
4.In a food processor or blender puree the cauliflower mixture with butter and about ¼ cup of the cooking liquid (you can use more or less depending on how thick you want the puree to be). Adjust seasoning before serving. (Note: I would not recommend using an immersion blender for this. I tried it, thinking it would be easier than digging out the food processor but given the small amount of liquid it was difficult to get completely smooth. Next time I’ll definitely take the extra time and use one of the other options I suggested.)
Jason and I have spent the last couple of days taking it easy and it has been really nice. I think we made it out of the apartment for all of an hour yesterday. We did a little better today—managing to squeeze in brunch with some friends and a trip to the grocery store (which was surprisingly empty for a Sunday—thank you Daylight Savings!) before coming home and relaxing. I capped the day with a Lost marathon while Jason spent some quality time in his green chair with a book.
I decided to go with the lazy Sunday flow and ease back into the kitchen with a fairly simple dinner—goat cheese chicken and cauliflower puree. Goat cheese chicken was one of the first things I ever made for Jason when we were dating and it remains a household favorite. It couldn’t be easier—slip a little goat cheese and basil underneath the skin of some chicken and roast until done. The hardest part is actually finding skin-on, bone-in chicken breasts! Since I didn’t feel like going to multiple stores today to try and find them, we ended up with chicken thighs instead and they worked just fine. It paired really well with the cauliflower puree—a light yet satisfying meal to close out the weekend.

Getting ready to go into the oven

Cauliflower, onion and garlic

Mixture pre-boil

Goat Cheese Chicken
Just barely adapted from Ina Garten
Ingredients:
2 bone-in, skin-on chicken breasts or thighs
1 4oz cylinder package of goat cheese, cut into 1/4 inch thick slices
Fresh basil leaves
Olive oil
Salt and Pepper
1.Preheat the oven to 375. Place chicken pieces on a sheet pan lined with aluminum foil or parchment paper (for easy clean up). Loosen the skin from the meat with your fingers.
2.Place 1 or 2 slices of goat cheese along with a large basil leaf (or two depending on the size) underneath the skin of each chicken breast/thigh.
3.Drizzle with olive oil and sprinkle with salt and pepper.
4.Bake chicken for 35-40 minutes (maybe less depending on size of chicken pieces you are working with) until the skin is slightly browned and chicken is cooked through.
Cauliflower Puree
Again, just barely adapted from The Kitchn
Ingredients:
1 small yellow onion, chopped
2 TBL olive oil
½ of medium cauliflower, cut into pieces
2 cloves of garlic, peeled
3 cups of milk
2 TBL butter
Salt and pepper to taste
1.Heat the olive oil in a large saucepan over medium heat. Add onion and sauté until soft, 2-3 minutes. Add cauliflower, garlic and milk. Season with salt and pepper
2. Bring to a boil, reduce heat and simmer (covered) until the cauliflower is tender (about 12-15 minutes). Be careful to reduce the heat to low otherwise the mixture might boil over!
3.Drain, reserving the liquid.
4.In a food processor or blender puree the cauliflower mixture with butter and about ¼ cup of the cooking liquid (you can use more or less depending on how thick you want the puree to be). Adjust seasoning before serving. (Note: I would not recommend using an immersion blender for this. I tried it, thinking it would be easier than digging out the food processor but given the small amount of liquid it was difficult to get completely smooth. Next time I’ll definitely take the extra time and use one of the other options I suggested.)
Saturday, March 13, 2010
These are a Few of My Favorite Things
*Jason has never seen The Sound of Music before. I find this shocking. But maybe it is not so uncommon among non-musical -loving males?
Since I have been gone most of the week (and have not done a whole lot of cooking as a result), I don’t have any new recipes to share just yet. Instead I thought I would share a few of our favorite kitchen-related items to tide you over in case the random musings about travel and phones aren’t doing it for you (I’m looking at you, Jason). Here are some of our kitchen essentials (in no particular order):
1.Wood cutting board. This was a wedding registry item and I love it. It gets used pretty much every day. Wood cutting boards tend to dry out over time so I recommend oiling it down with some mineral oil once a week to keep it looking nice (as you can see our board needs a good rub down).

2.Sharp chef’s knife. Another item which gets used everyday, this knife is actually Jason’s. When we were dating he occasionally cooked dinner for me at his apartment and he used to complain about not having any good knives. I bought the Victorinox 8 inch Chef's Knife for him one year as a birthday gift and soon had knife envy. It is a great all-around knife and pretty inexpensive for the quality. I was pretty psyched when he moved in and it became partially mine as well.

3.Dutch oven. This one is another wedding registry item (one that I didn’t really expect anyone to give us given the price tag---I was originally planning to buy this ourselves post-wedding with gift cards). Dutch ovens in general are great because you can use them on top of the stove and in the oven. I’ve used this one (and another smaller, round one—not pictured) to make soups, pot roast, and even bake bread. The colorful enamel coated ones (like Le Creuset and their much more affordable cousins) are so nice looking you can set them out—which is good because this baby would not fit in any of our small and already crowded kitchen cabinets so it lives on top of the stove.

4.KitchenAid Stand Mixer. This was a Christmas gift a few years ago. It makes baking (and making things like mashed potatoes) a breeze. Not much more I can say other than it’s pretty awesome.

5.Cuisnart Griddler. Yet another wedding registry item and one of the few things on it that Jason was excited about. Although we have used its Panini making capabilities a few times, it gets (almost) weekly use in the making of pancakes and French toast. Jason has insisted that the only way to make these items is to use an electric griddle and since he is the expert pancake/French toast maker in our family, I’ll give it to him.

6.Aerogarden. My parents gave me this as a Christmas gift last year and I was little skeptical at first but it works pretty well. And when you live in an apartment with a barely-there balcony, it is one of the only ways to grow your own herbs. (Jason also thinks its constant glow helps combat Seasonal Affective Disorder.) Right now we are testing out cherry tomatoes…we’ll see how they do.


Cherry Tomato Flowers!
7.Seghesio Wine Club. Summer before last we made a trip out to Northern California for my friend Amanda’s wedding. While we there we stopped by Healdsburg to visit my cousin Stephanie and her boyfriend. They took us on a crazy tour of the area’s wineries including Seghesio. I let myself get talked into joining their wine club (not too difficult considering it was our third or fourth stop of the day) which Jason made fun of me for in the days following our trip. Almost two years later we are still members and love getting the quarterly shipments of tasty Zinfandels and other California reds.

We get two bottles a shipment, four shipments a year. Here's what's currently in our inventory.
I'm always on the look out for new and amazing kitchen things...what are some of your favorite things?
Subscribe to:
Posts (Atom)