Thursday, April 29, 2010

Best Thursday Ever!

That is what Jason said when I told him this morning that we were having fish tacos for dinner. You know that game where people ask you if you were stuck on a desert island and you could only eat one thing for the rest of your life, what would it be? For Jason, I am pretty sure the answer would be fish tacos. Last year he went to San Diego for about 48 hours for a work trip and had fish tacos for dinner both nights. Fried, grilled, blackened…it doesn’t matter. If they are on the menu, he’s ordering them.

So I was not surprised when he came in from work last week with the latest edition of Everyday Food in his hand (90% of the time he gets the mail on his way in), pointed to the cover photo of…wait for it….fish tacos, and asked (very nicely) if I could please make those for dinner SOON.

How could I say no?

While I don’t know how authentic these fish tacos are (not being the connoisseur that he is), they were pretty easy to make. The ingredients are simple--broiled tilapia, red cabbage, chopped onion, and cilantro in a corn tortilla topped with a sauce made from sour cream, lime, and hot sauce (and I threw in a little cilantro—it just seemed like the right thing to do).  The verdict? According to Jason they were “excellent." He particularly enjoyed the sour cream sauce (as did I...the added cilantro was a good call). The only mistake-- not making much of a side dish to with it. I forgot that at restaurants we usually eat a basket of chips and salsa in addition to the tacos. Good thing we have some Ben and Jerry's Jamaican Me Crazy sorbet in the freezer!


Why do they call it red cabbage when it's really purple?


Fish Tacos with Cabbage and Lime
Adapted (a smidge) from Everyday Food
Ingredients:
2 fillets of boneless, skinless tilapia fillets, cut into thin strips
1 TBL olive oil
Salt and pepper
¼ cup sour cream (I used the light variety)
1 lime, one half finely zested and juiced with the other half cut into wedges
Hot sauce
6 corn tortillas
½ small head red cabbage, thinly sliced
½ cup fresh cilantro, chopped
½ small white onion, finely chopped

1.Heat broiler with rack in highest position. Pat fish dry and place on rimmed baking sheet. Drizzle with oil and season with salt and pepper. Broil until fish is brown on top and cooked through (about 5 minutes or less if you have really thin fillets like I did)
2.Meanwhile, in a small bowl, combine sour cream, lime zest and juice (from half of the lime), about half of the chopped cilantro, and a few dashes of hot sauce. Season with salt and pepper.
3.Warm corn tortillas over gas burner (if you have it) or heat in the oven for 5 minutes until pliable.
4.Build your tacos—add fish and top with cabbage, cilantro, onion, and sour cream sauce. Serve with lime wedges.

Postcard from Seattle, Part 2

When we last left off I was ogling the bountiful produce at Pike Place Market and taking pictures of the original Starbucks. My original plan had been to grab some lunch at one of the stalls at Pike Place but I wasn’t super hungry yet so I decided to take a walk to where Seattle began—Pioneer Square.

Pioneer Square is where one of the first founders of Seattle—Henry Yesler—built his sawmill back in the day. It is also home to the city’s first skyscraper and lots of cool galleries, interesting parks, and coffee shops. The area definitely has a different feel than other parts of the downtown area—brick buildings, ivy, and unexpected sanctuaries from city life.


At this point the rain started coming down and I was feeling a bit weary from all the walking so I headed to Zeitgeist Coffee to take a load off and grab a pick me up.  My latte did not disappoint:


After checking my email and consulting my newly acquired guide book I decided to head back out into the rain, back to Pike Place Market to grab a bite to eat. I ended up eating a grilled salmon sandwich at Lowell’s (very fresh and very tasty).  Refueled, I headed back into the misty weather and decided to take a break from the rain at the Seattle Art Museum.

SAM is home to a pretty eclectic collection of Native American, African, old-school European, and modern American art with some ancient Greek and Roman artifacts thrown in as well. I’ll be honest, it was a bit schizophrenic for my taste, but I did enjoy the Pacific Northwest Native American exhibits and there was a pretty cool photography exhibit in the modern art section as well.

At that point it was approaching late afternoon and I wasn’t sure what I wanted to do the rest of the day. I knew I wanted to be in kind of early since I had a 6:00am flight home the next morning (getting up at 3:30am for that was painful, let me tell you).  I was trying to decide whether it would be worth it to visit the Seattle Space Needle or whether it was just too touristy when I walked outside. Lo and behold—the sun was out! The skies were blue! It was beautiful weather. I thought I might finally get a peek at those Olympic Mountains so I headed back to the waterfront. Just as I got there, they were boarding a boat to do a harbor cruise so I decided to take that as a sign and hopped on board.

Although incredibly touristy (they made me have my picture take before boarding the ship which was somewhat awkward since I was sailing solo), it was definitely an hour well spent on such a beautiful afternoon. I got a little history, some gorgeous views, and some time on the blue waters of Elliot Bay. It was the perfect way to end the day.


The Space Needle and the Olympic Sculpture Park from the water
I spent a lot of time trying to get a shot of the Olympic Mtn range...here you can see one of Seattle's ferry boats and if you squint your eyes just right you might see the snow topped mountains in the background. Near the clouds.

All in all my day in Seattle was great. Next time I go I would like to spend more time off the beaten path. But for my first solo sightseeing trip it was definitely a good one. And I look forward to going back and sharing the sites, sounds, and tastes of Seattle with Jason sometime in the not too distant future.

Wednesday, April 28, 2010

Postcard from Seattle, Part 1

As you may remember, I spent a week in the Pacific Northwest a few weeks ago as part of my whirlwind seven week tour of the country for work.  Originally the trip was supposed to be two travel days (to get there and back) and one day each in Portland/Salem, Oregon, and Olympia, Washington, in various meetings. Since I was going all the way out there (after 6 weeks of travel for work) I decided I deserved the opportunity to see some of what the area had to offer. So I took a day off and spent it exploring Seattle.

Given the crazy schedule I had been leading up to my trip I did not have time to do my usual planning. All I did was print out Frommer’s suggested one day itinerary for seeing Seattle and hoped it would guide me well.  Armed with that and my Droid, I figured I’d be able to “wing it.”

That lasted all of 2 or so hours.

I ended up buying a Seattle guide in the Seattle Aquarium giftshop---one of my first stops of the day (more on that in a second). Oh well. You know what they say about old dogs and new tricks, right?! But I’m getting ahead of myself…

Still on something closer to East Coast time despite three days of being on the West Coast, I woke up early and was out the door of my hotel by 7:45am. The weather forecast also indicated that rain was going to move in around noon so I thought I should try and take advantage of not having to use an umbrella while I could. My first stop was going to be Pike Place Market—unfortunately I was a little early even for them. So I grabbed a coffee and a bagel and walked down to the Olympic Sculpture Park instead.


View of the city from the park

The park is part of the Seattle Art Museum (SAM) and consists of 9 acres of exhibits and walking trails all along the waterfront. On a clear day you can see the beautiful Olympic Mountains too. Unfortunately, the day was not that clear.

After a nice walk checking out the art and the view, I decided to walk back towards downtown along the waterfront. I like water and boats and pretty much anything that goes along with those things (I used to be obsessed with Deadliest Catch for goodness sakes) so I really enjoyed the walk, seeing commercial cargo ships, the big fishing boats, the cruise ships, the ferry boats….Seattle really is the place to be if you are in to all things maritime.  After my waterfront walk, I went to the Seattle Aquarium. Given my predilection for life aquatic, I also really like aquariums and can’t resist visiting them whenever I come across them.

The Aquarium

The Seattle Aquarium was nice...small but the real deal. It was very locally-focused which I enjoyed. And does not have any animal shows which I also appreciate. Besides, who needs trained animals when you have really adorable sea otters like these:


My marine life (in all its forms) desire satisfied, I decided to see if Pike Place Market was bustling yet. It was. It was also a foodie’s dream, albeit a bit touristy. Beautiful , fresh seafood and produce everywhere you looked. Gorgeous fresh flowers that were SUPER CHEAP….I walked around there for a good 45 minutes taking everything in and wondering if I could get any of it home with me. I settled for The Pike Place Market Cookbook instead.


Pike Place Market is also home to the very first Starbucks. I decided not to stop there because I wasn’t sure it would be all that different from any of the other Starbucks around the world. And besides, I was on the hunt for latte art! And I wasn’t sure Starbucks…even the Mothership…was going to get me there.


This is where it all began.


Stay tuned for Part 2 where we check out some more art, waterfront views, cool little parks, and yes…latte art!

Tuesday, April 27, 2010

Fun Weekend Project Idea II

Remember back in February (not long after launching this blog) I saw a recipe on Serious Eats for making homemade goat cheese and blogged about how it seemed like a fun idea and then I actually made it!

Well I have another fun weekend project idea in the making....again from Serious Eats. This time? Peanut Butter Graham Crackers....from scratch! Check this out:

http://www.seriouseats.com/recipes/2010/04/bread-baking-peanut-butter-graham-crackers-recipes.html
I was just thinking yesterday that I should buy some graham crackers for a relatively healthy treat to keep around the house. Ok, to be honest, it started out with Jason mentioning camping which makes me think about Smores which then led to thinking about graham crackers (see how it all connects?). So when I saw this recipe, it was like the people at Serious Eats were reading my mind-- not only am I in the mood for graham crackers but peanut butter is one of my favorite things on earth (I can't buy it anymore because when I do I end up eating the whole jar...by the spoonful).

The only thing holding me back from high tailing it to the grocery store to make sure I have all the ingredients (I think all I am actually missing is the peanut butter) is that it requires a lot of rolling dough and the limited counter space in my current kitchen makes that difficult. But I might be willing to make an exception for this....stay tuned!

Family Favorites

Before I launch into today’s post, I wanted to first say thanks to my friends Stephanie and Katy for giving me some love on their respective blogs yesterday! And to any of their readers who are joining us for the first time today—welcome! I am excited to share my adventures in life, marriage and cooking with you :)

Today was a busy day.  In addition to my usual 8 hour work day I also had a doctor’s appointment and a late conference call to contend with.  So when it came to planning this week’s dinner menu/grocery list I decided to get a little help where I could and buy some pre-made beef kebabs from our local grocery store. That way all I would have to do for the bulk of tonight’s dinner was to drizzle a little olive over the kebabs, add a little salt and pepper, and stick them under the broiler for 7 minutes or so per side.

As I was perusing the produce aisles yesterday for something to go with our kebabs, I decided that I needed to make squash casserole.  Something you all may not know about me yet is that I come from a pretty Southern family. Both my parents grew up in Tennessee and that is where the vast majority of my extended family still lives. I grew up eating lots of Southern staples, including squash casserole. Every Southern cook worth their grits knows how to make this dish.

I got my particular recipe from my mother. To be honest, it’s not really a recipe. There aren’t really exact measurements—instead words like “some” are used. I’ve found that a lot of family recipes (Southern or not) are like this. My grandmother, for instance, makes the best macaroni and cheese from scratch. Once when I was in high school I called her to try and get the recipe and instead she walked me through the process of how to make it (again using words like “a little” and “some” instead of actual measurements). It definitely did not come out right. One day I will try and make it again-- or her potato salad (that which I hold all other potato salads up against…most fail miserably).

My mother’s squash casserole is somewhat the same way. When I called her for the recipe last summer she tried her best to give me more exact instructions, even throwing phrases like “1/3 cup” in there. But the truth is you just have to make things like this enough to get the hang of it. You have to know what it looks like.  The last time I made squash casserole, it was pretty close to perfect. Today, on the other, hand it was a little too liquid-y. But it still tasted good.  And it reminded me of my childhood. And that is good enough for me.


Squash Casserole
Adapted from my mom

Ingredients:
3-4 large yellow squash, sliced
1 onion (preferably Vidalia because HELLO! this is a Southern dish), chopped
2 TBL butter
Salt and Pepper
1 egg
1/3 cup of milk
1 package of shredded cheddar cheese (I used the reduced fat/2% milk variety)
Cracker crumbs (Saltines work best but any basic cracker that doesn’t have an overwhelming flavor will do)

1.Place sliced squash in a medium sauce pan. Cover with water and bring to a boil. Once it has reached a boil, add some salt, cover and simmer for about 10 minutes.
2.Drain squash and return to pot. Add chopped onion, butter, and salt and pepper to taste.
3.Beat egg and add to squash mixture. Add half of milk to start (amount of milk needed will depend on amount of squash you are making). Add 1/3 to ½ cup of shredded cheese to start. Add cracker crumbs (maybe 10 crackers, all crushed up). Mix together. Add more milk, cheese, and/or cracker crumbs until you get the right consistency—you want it to be moist but hold together fairly well. A little liquid is ok but you don’t want there to be lots of liquid in the bottom of the pan.
4.Spoon mixture into a greased baking dish and top with additional grated cheese (as much or as little as you would like).
5.Bake at 350 for 30 minutes.

Monday, April 26, 2010

Just Call Him Paula Deen

Backstory: If I let him, Jason would eat at least 5 rolls with dinner every night. With a stick of butter. It's why I either don't serve bread with dinner very often or only buy the 4 count can of crescent rolls.

This g-chat just happened.

Me: I'm getting ready to go to the grocery store...in the rain :(
anything else you want/need?

Jason:  crescent rolls
lots of em

Me:  hahaha
I think we have a can in the fridge already

Jason:  or any other bread

Me:  just to snack on?

Jason:  that I can put butter on
I dunno
don't worry about it

Me:  yes, that is why you like bread so much...because it is really a vehicle for butter!

Jason:  yup

Foxfield, the Conclusion

We made it back from another fun and successful Foxfield weekend. Here are some of the highlights:
  • Friday dinner at Michael’s Bistro (sorry they don't have a webpage!): Michael’s is a Cville institution and is one of the handful of establishments on “the Corner” that hasn’t changed in the last 10 or so years since I first came to UVA. It features tasty food, good beer, and a low-key atmosphere perfect for hanging with a group. 
  • Bodo’s Bagels: We enjoyed the always popular Bodo’s Bagels (another Cville institution) on both Saturday at Foxfield and on Sunday morning before we headed home. Bodo’s is hands down my favorite bagel place of all time. I have never had a bagel anywhere else that I thought was anywhere near as good—that might seem like blasphemy coming from someone who lived in NYC for a couple of years but it’s true. My dream is to open a franchise in Northern Virginia (home to many a UVA alum)—it would make a killing!
  • The Main Event: We could not have asked for a better Foxfield. The rain held off (we even had a moment of sun), we did not sit in traffic, and the set up/break down of our plot was a cinch. And we saw horses—lots of them! Good times were definitely had by all. I credit much of the success to Stephanie and Matt’s expert planning.
  • And my food contributions? A hit! All but 3 of the cookies were eaten along with about 2/3 of the pasta salad…given the significant quantities of food leftover, that’s saying something.  And I got a number of compliments regarding both. I would definitely recommend making either or both of these recipes for any picnic/tailgate/potluck you may have this Spring/Summer!
Unfortunately our weekend did not end with this high note. Poor Jason had to go into the office  yesterday afternoon for what he originally thought would only be a few hours of work. He didn’t end up getting home until midnight! Not the best way to end the weekend/start the week but here’s hoping that it only gets better from here.

Saturday, April 24, 2010

Foxfield, Part 2

In addition to making a dessert for Foxfield I decided to also bring some sort of pasta salad type thing. I thought it might be a good way to ensure we had something else hearty to eat and since pasta salads are a traditional staple of picnic/tailgating fare it would fit into the overall spread.

The trick was to find something that did not use dairy since we needed something that would be ok sitting out for a good part of the day. I looked around and found a recipe for Gazpacho Pasta Salad on one of my newer food blog finds—Cheap Healthy Good. This is the second recipe I’ve tried from CHG (the first was a vegetarian bean chili that Jason and I both really enjoyed this winter) and I’ve got to say—I am fan. It’s nice to have a source for good food that is also healthy and that doesn’t require a lot of expensive ingredients. CHG also provides the nutritional and cost breakdown for each recipe it provides.

This particular pasta salad takes all the ingredients from gazpacho (a delicious, veggie-based cold soup that is great for the summer when tomatoes are at their peak freshness) and adds some rotini in for good measure. To me it sounded like a great dish for day out in the sun (or rain, as the case may be). And (as with many, if not most, of the recipes I make lately) it was super easy to make! First you make the sauce—a can of diced tomatoes, red pepper flakes, garlic, basil, salt, and red wine vinegar all go into the blender and come out pure deliciousness. Then you chop up red pepper, yellow pepper, cucumber, scallions, and parsley and toss it all together with some cooked pasta.  SO GOOD!


Gazpacho Pasta Salad
Adapted (a tiny tiny bit) from Cheap Healthy Good

Ingredients:
1 (14 ½ ounce) can diced tomatoes (I used the garlic and onion variety for maximum flavor)
3 small garlic cloves (might want bigger ones if you don’t use the garlic-y tomatoes—see above)
1 teaspoon red pepper flakes
¼ cup fresh basil leaves
1 TBL red wine vinegar
Salt
1 pound rotini pasta
1 cucumber (I used the hot-house or English variety since they are a little less juicy), peeled, quartered lengthwise , seeded, and cut into small chunks
1 red bell pepper , chopped
1 yellow bell pepper, chopped
1 pint of grape (or cherry) tomatoes, halved
¼ cup fresh parsley, chopped
3 scallions, thinly sliced
2 TBL olive oil

1.Combine diced tomatoes, garlic, red pepper flakes, basil, vinegar, and ½ teaspoon salt in a food processor or blender and process until smooth. Transfer to a non-metal bowl, cover with plastic wrap and refrigerate for at least two hours.
2.Cook pasta in salted water according to directions. Drain and rinse well with cold water.
3.Combine remaining ingredients in a large bowl. Add pasta and tomato sauce and toss well. You can serve immediately or refrigerate until ready to serve.

Next week there will be a recap of our day at the races and how my dishes were received. Stay tuned!

Friday, April 23, 2010

Foxfield, Part 1

Have I told you that I went to the University of Virginia as an undergrad? Well, I did. I am a Hoo and proud of it! UVA is a great school with lots of traditions—one of which is the Foxfield Races. Every April thousands of students, alumni, and residents of Charlottesville descend upon a great big field outside of town to tailgate and watch some horses occasionally run by.  But mostly to tailgate.  Surprisingly, I have been to Foxfield more times since I graduated from college than when I was actually there (I did not attend my first year at UVA because I did not really understand what all the fuss was about, nor did I attend my fourth year because I was in a play and I didn’t think that tailgating all day before that night’s show was the most prudent idea!).  We took a break from the festivities last year and I wondered if we were getting too old to dear ol’ Foxfield.

The answer, apparently, is no. This Saturday Jason and I will be standing in a field (probably in the rain) and reliving my college years with friends, food, and drink.  After many stressful work weeks, I think this is exactly what I need to let go and let loose.

My friend Stephanie has been the driving force behind Foxfield this year. She has organized everything to a “T.” I felt pretty guilty for being mostly incommunicado during all of the planning (to be honest, Foxfield really snuck up on me this year with all of the traveling), so last week I asked her if I could bring a couple of items. We settled on a pasta salad and some sort of dessert.

Planning food for Foxfield (or any tailgate really) requires something that can withstand the elements, whether they be heat, rain, or sun (or all of the above). That means no dairy or anything else that could melt or get soggy.  After much debating, I decided to try a recipe for Toasted Coconut Shortbread I had seen previously on SmittenKitchen. Shortbread is generally a pretty sturdy cookie so I thought it would hold up well outside. And the idea of coconut seemed sort of Spring-y which is usually what I think of when I think of Foxfield.  It sounded perfect.

For those of you who have never made shortbread—it is really a cinch.  All you do is mix butter, sugar, salt, vanilla, and flour together. Voila—you have shortbread! The tweak in this recipe was adding crushed toasted coconut to the dough.  The result was a lightly sweet, buttery cookie with a hint of coconut goodness.  I hope it will become a Foxfield favorite!


Toasted Coconut Shortbread
Adapted from SmittenKitchen

Ingredients:
½ cup sweetened shredded coconut
¾ cup (or 1 ½ sticks) unsalted butter, room temperature *
½ cup sugar
½ teaspoon salt (would want to increase to ¾ teaspoon if you are using coarse salt)
½ teaspoon vanilla
1 1/3 cups all purpose flour
* It is really important that your butter is soft. I let mine sit out for about 3 hours before I starting cooking.

1.Preheat oven to 325. Line rimmed baking sheet with parchment paper. Spread coconut evenly over the top. Bake until coconut is lightly golden, stirring occasionally, about 8 minutes. Cool completely. Then place coconut into a plastic sealable bag and crush until coarsely ground (you can also do in a blender or food processor if you want it more finely ground).
2.Using an electric or stand mixer, beat butter and sugar together until well blended. Mix in salt and vanilla. Add flour in two additions. Mix in toasted coconut. Gather the dough together and wrap in plastic. You can either flatten into a disc (if you want to roll out and use cookie cutters or to cut into rectangles) or shape it into a log so you can do it slice and bake style (which is what I did). Chill for at least 1 hour (but I’d recommend a little bit longer especially if you want to do slice and bake).
3.Preheat oven to 325. Line rimmed baking sheet with parchment paper (or reuse the one you used for the coconut like I did). Cut out your cookies using whatever method you prefer (if you choose to roll out the dough and use cookie cutters, make sure you roll it out to about ¼ inch thickness on a lightly floured surface). Transfer cookies to baking sheet(s), spacing an inch or so apart.
4.Bake until a light golden brown, about 20 minutes. Cool on the baking sheet(s) for 10 minutes and then transfer to racks to cool completely.

Next on the Foxfield menu…Gazpacho Pasta Salad!

Thursday, April 22, 2010

Back to Reality

Tuesday’s relaxing return to life-as-I-know-it was short-lived. By yesterday, things had returned to their normal levels of activity. After a long day of out-of-the-office meetings, I came home and wanted nothing more than to relax. So I was understandably a bit annoyed with myself for having planned to try out a new recipe for dinner.

Lucky for me, the recipe ended up being ridiculously easy to make (I had to have subconsciously planned it that way, right?!). I decided to give Emeril’s Chicken -Patty Pockets (say that five times fast) from last month’s Everyday Food a whirl.  The Emeril I am referring to is, of course, famous New Orleans chef Emeril Lagasse. (Do you think there are many other people out there named Emeril? Just curious.) A year or so ago he established a partnership with Martha Stewart’s empire and now has a monthly feature in Everyday Food. This was my first time trying out any of his recipes—Everyday Food or otherwise—and it turned out pretty well.

Basically you make mini-chicken burgers (which are seasoned with onion, parsley, garlic, and a variety of spices) and stuff them in pita along with lettuce, tomatoes, cucumbers and a Minted Yogurt Sauce. Everything was super easy to make and pretty good too. I was honestly surprised by how much I liked the chicken burger/patty/things.  I don’t know if it was the ground chicken (which I don’t think I’ve ever had before) or the combination of spices but it was surprisingly flavorful.  I might experiment with ground chicken again.


A couple of things to note if you decide to give this recipe a try—the original recipe called for ground dark-meat chicken. My grocery store only had one variety of packaged ground chicken and it did not specify if it was white, dark, or some combination (and to be honest, I didn’t really spend much time investigating). Whatever I had it worked just fine. My guess is that if you bought all white meat, it might be a little drier (because there is very little fat in white meat) which means you might need to tone down the breadcrumbs or add an additional egg to moisten it up. Also, the recipe said to make 8 patties from the meat…I ended up with 10 and they were still pretty big to stick in a pita pocket (I cut them in half in order to squeeze one whole chicken patty in each pita half). Next time I will look for some larger pitas or perhaps try flatbread instead as our poor pockets were bursting at the seams.


Emeril’s Chicken-Patty Pockets
Adapted from Everyday Food

Ingredients:
1 pound ground chicken
1 large egg, lightly beaten
½ cup dried breadcrumbs
¼ cup finely chopped onion
4 TBL of dried parsley or ¼ cup fresh parsley, chopped (I did not have fresh parsley so I went with dried)
1 TBL of minced garlic
1 teaspoon salt
½ teaspoon cayenne pepper
½ teaspoon ground coriander
¼ teaspoon ground cumin
¼ teaspoon ground nutmeg
Cooking spray
Pita pockets or flatbread
Lettuce, sliced tomatoes, and cucumbers for serving
1 cup plain yogurt
2 TBL chopped mint
1 lime, juiced

1.Heat broiler, with rack in highest position. Line rimmed baking sheet with foil and coat with cooking spray.
2.In a large bowl combine chicken, egg, breadcrumbs, onion, parsley, garlic salt, and spices and mix until well blended (I find the hands work best for mixing this type of thing). Shape chicken mixture into 8-10 patties and place onto sheet pan.
3.Make Minted Yogurt Sauce. In a small bowl, stir together yogurt, chopped mint, juice from 1 lime, salt and pepper to taste. Refrigerate until ready to serve.
4.Broil until browned, about 4-5 minutes. Flip and cook until cooked through, about 4-5 minutes more.
5.Cut a pita round in half. In each half place lettuce, 1-2 tomato slices, 1-2 cucumber slices and 1 chicken patty cut in half. Top with Minted Yogurt Sauce and serve.

Wednesday, April 21, 2010

What a Good Day Looks Like

Yesterday, something amazing happened-- I woke up in my own bed!  I had a busy (but not overwhelmingly so) and productive day at work. I worked out. I made dinner (more on that in a minute). And I watched Glee.

It was a good day.

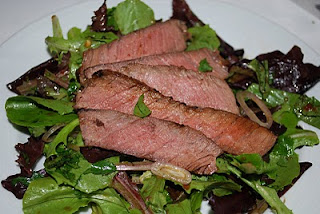
I decided to give myself a little bit of time to ease back into full blown cooking mode by making an easy dish that also happens to be a tried and true favorite—Thai Beef Salad.  This salad is something that Jason and I have made numerous times over the years; it is so familiar I barely need the recipe anymore!

You start by making a marinade/dressing from lime juice, soy sauce, canola oil, brown sugar, fresh ginger, and garlic-chili paste. Half of the mixture is poured over London broil which is then set aside to marinate for a couple of hours. The other half is reserved to be used as a salad dressing. It is a really flavorful mix that has just the right combination of salty, sweet, and spicy (if you like that sort of thing which we definitely do).


The salad part is even easier--- salad greens are tossed with fresh basil, cilantro, shallots and the reserved dressing.  In the past I have also included red or yellow pepper which can be a nice addition if you feel like jazzing things up. But it is pretty darn good on its own. Try it….I’ll bet you like it :)


Thai Beef Salad
Adapted from Ellie Krieger

Ingredients:
1 (1lb) piece of London broil (could also use flank steak)
3 TBL lime juice
3 TBL low-sodium soy sauce
3 TBL canola oil
2 TBL firmly packed brown sugar
1 ½ teaspoons minced or ground fresh ginger (since we make this salad fairly often, I tend to buy a jar of ground fresh ginger and keep it in the fridge—you can find it in the produce section).
1 ¼ teaspoons garlic-chili sauce (more or less depending on how spicy you like it)
Salad greens
1-2 shallots, thinly sliced (quantity depends on size…I had an enormous one yesterday so only used one)
½ cup chopped fresh cilantro leaves
1 cup fresh basil leaves, sliced into ribbons

1.Make the marinade/dressing. Combine lime juice, soy sauce, canola oil, brown sugar, ginger, and garlic-chili sauce together in a small bowl. Place meat in a sealable bag and add half the mixture to the bag. Seal bag and marinate in the refrigerator for at least one hour (the longer the better—you could even do overnight). Cover the remaining mixture and stick in the fridge for later.
2.Preheat the oven to broil and line the bottom of the broiling tray with aluminum foil (it will help with clean up).  Place meat on the grated top of the broiling tray and broil about 8 minutes per side for medium (for medium rare, the recipe suggests 5 minutes per side; if you want it more like medium-well I’d go with 10 minutes). Let the meat rest for about 5 minutes and then slice thinly.
3.While the meat is cooking, combine the lettuce, shallots, cilantro and basil in a large bowl. Add the reserved dressing and toss to coat. Top with beef and serve.

Tuesday, April 20, 2010

Home Sweet Home

That's right. I'm back. For good this time. (Or at least until this weekend but that is a fun trip that doesn't require getting on a a plane so it doesn't really count.)

Here is a by-the-numbers recap of my work travel extravaganza:

11: time I got home last night
7: weeks of consecutive travel
10: states visited
21: flights taken
3: airline carriers
2: delayed/canceled flights
5: hotel chains
11: meals Jason had to make for himself
84: unread blog posts in my Google Reader this morning
2 or 3: cups of coffee I will need to keep me going today (conservative estimate)

Saying I am happy this craziness is behind me is an understatement. I can't wait to get on with normal life!

Sunday, April 18, 2010

Saturday (!) Night Dinner: Gnocchi Edition

As I mentioned yesterday, I am leaving today for the final trip of the work travel madness that began back in March (I am hopefully winging my way to the Midwest even as we speak). Since I was only going to be having half a weekend at home (on the heels of being gone the previous work week), Jason and I instituted a “no outside plans” policy yesterday so that we could spend some quality time with each other. Of course, life being life, we were inundated with social invitations from various friends and family members. But we stuck to our guns and had a pretty relaxing day just the two of us (with a few work obligations thrown in for good measure).

Sunday travel = no Sunday dinner, so I decided to make it Saturday Night Dinner. It was a good idea in theory but, for some reason, I had a really hard time coming up with anything I wanted to make.  I think all the travel and eating out has thrown me off my game. Usually I enjoy meal planning but it felt like such a chore yesterday trying to come up with something that I wanted to cook and that would provide some leftovers for Jason to eat tonight or tomorrow while I am gone. I ended up handing the recipe binder over to Jason and letting him decide. His pick? Gnocchi with Summer Vegetables from one of last year’s Everyday Food issues. I had not made this before but had saved it thinking it might make a quick and healthy meal sometime in the future. I am not sure what about it caught Jason’s eye but we decided to give it a shot.

It was definitely easy---sautéed squash, zucchini, and grape tomatoes combined with basil, parmesan cheese, and some lemon juice serve as a light sauce for frozen gnocchi.  While it didn’t blow me away, I’d probably make it again. Next time I’d add some red pepper flake to give it a little kick as it seemed to need a little something something—a comment complaint I've had with many of Everyday Food’s recipes (sorry Martha!). I might also try to find fresh gnocchi next time—the consistency of the frozen variety left a little something to be desired. Despite these small flaws, I’d say this dish is definitely a contender for a future weeknight meal and worth a try if you want something quick and easy.


Gnocchi with Summer Vegetables
Adapted from Everyday Food

Ingredients:
1 package frozen gnocchi (mine was 16 ounces)
1 TBL olive oil
1 zucchini, quartered and sliced
1 yellow squash, quartered and sliced
2 garlic cloves, minced
1 pint grape tomatoes, halved
¼ cup fresh basil, chopped
2 TBL grated parmesan cheese
Juice of 1 lemon
Salt and pepper to taste

1.Bring a large pot of water to a boil. Add a generous amount of salt. Cook gnocchi according to package instructions.
2.Meanwhile, heat oil in a large skillet over medium-high heat. Add squash, zucchini, and garlic. Season with salt and pepper. Cook, stirring occasionally, until vegetables start to get tender (about 4-5 minutes).
3.Add tomatoes and cook until juices are released, about 3-4 minutes.
4.Reserve ½ cup of cooking liquid and drain gnocchi. Add gnocchi to the skillet and add enough of the cooking liquid to create a sauce (I added almost all of the ½ cup). Toss and let cook for about 30 seconds.
5.Remove from heat and stir in basic, cheese and lemon juice. Check for seasoning.

Saturday, April 17, 2010

Postcard from the Pacific Northwest

I’m baaaa-acck! After a week out of town and a brief blog absence, I am finally FINALLY home again. For about 40 hours at least. That’s right, I am heading back out for the final business trip of the seven week up-in-the-air extravaganza tomorrow (yes, Sunday). But the final countdown has definitely begun.  I couldn’t be happier.

So last week I was in the lovely Pacific Northwest, my very first trip out that way. And I have to say, I loved it. Not the crazy work part, but that general part of the country. It’s beautiful. Lots of green, lots of trees, and amazing majestic, snow-covered mountains practically everywhere you look.

My first stop was Portland, Oregon. I think this may have eclipsed Austin as the number one city on our list of places we’d move to if we ever left the DC area. It was a beautiful city and I would love to go back (especially since I did not get to see as much of it as I would have liked) and show Jason since I know he would really like it too.  I was lucky enough to be able to stay at the Hotel Monaco in Downtown.  Hotel Monaco is part of the Kimpton hotel chain and if you ever have an opportunity to stay at one of these hotels you should. They are really cool, quirky hotels, definitely not your run-of-the mill establishments.


View from my hotel room

Downtown Portland (courtesy of portlandground.com)

My first night there, my colleague and I walked through the city, passed the famous Powell Books, to the Pearl District which is home to lots of cool shops and restaurants. We ate tapas and drank tasty sangria at Andina. So so good.  One of our dishes was the conchas a la parilla-  grilled diver scallops with a garlic lime butter sauce and crispy onions. I like scallops but these might have been one of the best things I have ever eaten.  I am salivating just thinking about them!

The next day we traveled to Salem for meetings but on our way back to the city we decided to take a detour through Rickreall and McMinnville to see if we could make it to at least one of the famous Willamette Valley wineries before closing time. We made it to Firesteed Winery with about 10 minutes to spare!  Willamette Valley started out as the premier destination for pioneers who made their way west via the Oregon Trail (loved that computer game!) back in the day. Today, it is still home to 70% of Oregon’s population as well as more than 200 wineries known worldwide for their Pinot Noir grapes.  I knew I couldn’t come home to Jason without a bottle of genuine Willamette Valley Pinot Noir to share!

On day 3 we left Oregon to drive up to Olympia, Washington for additional meetings. On our way there we decided to stop at the Mt. St. Helens National Volcanic Monument Visitors Center (mostly because I needed a bathroom break but also because my co-worker who is from Washington State insisted that it was a must-see for any first time visitor). I had always heard about Mt. St. Helens but watching the little orientation video and seeing the before/after pictures was pretty amazing. It’s crazy to think that a lot of the Cascade Mountains (which run all along Oregon and Washington) are volcanoes that could blow at any time! But I guess the Pacific Northwest is part of the so-called Ring of Fire.


Mt. St. Helens before/after its eruption in May 1980
 
 View of Mt. St. Helens from Visitor Center (it was cloudy!)

The Cascades were probably one of my favorite parts of the area. They just seem to pop out of nowhere (largely because of all the clouds). You are driving along and look up and OH MY GOSH! there is huge Mt. Rainer right there in front of you.


Since I clearly couldn't take a picture of Mt. Rainer while simultaneously driving (dangerous!), this comes from Google Images. But this was seriously what it looked like. Only cloudier.

As someone who has lived on the East Coast most of their life, I am just so not used to these kinds of mountains. They are a whole different animal than the Blue Ridge Mountains I am used to!

My final day was spent solo in Seattle, doing some sight-seeing. But that is a blog post for another day :)

Wednesday, April 14, 2010

Steamed Clean

Anyone who knows me knows I hate ironing. In fact, I just don’t do it. Ever. Ok, hardly ever. I iron only when the occasion calls for being 100% wrinkle free (e.g., big business meeting, formal events, etc). I don’t mind a wrinkle here or there, certainly not enough to warrant hauling out the ironing board (which currently lives in the back of one of our closets and is a huge pain the butt to get in/out) and spending an inordinate amount of time to get (what I feel are) minimal results.

Needless to say I don’t iron Jason’s clothes either. If I am not going to take the time to iron my own, I am definitely not going to iron someone else’s (particularly when they are totally capable of doing it themselves). Jason used to iron all his work clothes before wearing (well 90% of the time, anyway). Given the pain that is ironing in our humble abode (see above), that number has taken a hit as well. Which is why he was totally onboard with the idea of using some of our leftover wedding giftcards to buy a garment steamer.

We have friends the swear by these devices and say they are just as good and much easier to use than the standard iron. We decided to give it a shot, especially since it would essentially be free to us (thanks to our family and friends’ generosity!) I did my due diligence trying to find the best garment steamer on the market. General consensus was that the Jiffy brand steamers were #1. Unfortunately, they do not sell that particular brand at either of the two stores where we still had giftcards—Bed, Bath, and Beyond and Macys. Since we were trying to go the free route, we decided to go with the runner-up : the Rowenta Precision Valet.


Originally $259.99 at Macys, it was on sale for $169. Definitely not cheap. And probably not money we would have spent if  it had been coming from our own pockets but we decided to give a shot.

It was pretty easy to put together (I was able to do by myself in about 15 minutes while Jason was putting in some hours at work on Sunday). I tried it out on two pretty tough items of clothing in terms of wrinkles and ironing—1) 100% cotton pants and 2) a blouse made of silk and cotton.


The verdict? As you can see from the before and after shots, the results were pretty good. To be fair, these are the most wrinkle-prone pants I own so the fact that it got the worst of the wrinkles out is saying something. Obviously the steamer is not going to give you that crisp look that the iron will (although there is apparently a crease attachment that I have not yet tried out), but it’s going to get enough of the wrinkles out to make me happy. And it was certainly a bit easier to deal with than the iron.

Tuesday, April 13, 2010

Oh the Places We Could Go

A week or so ago I mentioned that Jason and I were struggling with jobs and where to live, etc. While we are continuing to struggle with when and where to take that next step, I thought it might be fun to share some of the locales we have been (only half-seriously) considering should we decide to start over somewhere new.

Here are the top three areas that meet our general criteria of 1) having a real tech center (for Jason’s gainful employment); 2) being in or close to a state capital (for my gainful employment); and 3) having a lower cost of living than the DC area:

3. Denver, CO


Other Pros: most federal jobs outside of DC, near our friends Ryan and Katy who live in Boulder, skiing opportunities (for Jason)
Cons: too cold (for Lindsay)—it snowed there like last week and I’m not sure I can handle that much winter, we’ve heard that Denver itself is not as nice as some of the surrounding areas and we are trying not to have long commutes

2. Raleigh/Durham, NC


Other Pros: growing tech industry, lots of health care relate job opportunities, closer to family than the other options, mid-Atlantic state = not as big of a change
Cons: Playing it too safe?

1. Austin,TX


Other Pros: heard really amazing things about this city (consistently rated one of the best places to live), lots of potential job opportunities for both of us, fun place to try out, warm (for Lindsay)
Cons: Are we Texas people?

I should say that we are not really considering any of these places seriously at the moment (and we haven't even visited any of these places together to know whether we'd actually want to live there or not).  These are just the places we’ve talked about as potential options should we decide we’ve had enough of DC/Northern Virginia (and its traffic and sky-high home prices).

Where else should we be looking?